3D Printed Parts (For those without a 3D Printer)

So something to slide tightly over the sprocket, while it’s in the 12 o’clock position, with a vertical tab on the edge for a tape measure to ‘hook’ on to? Am I visioning this accurately?

Just a quick 3:00am mock up of what I think you’re talking about…

1 Like

yeah! you are genious!!! :slight_smile:
perfect for tape or laser measure

1 Like

@wcs39204 … I would just increase size of the vertical tab a little bit … and I assume you did already, the inner side wall must be inline with the center of the sprocket …

I didn’t even know the MetalMaslow sled had a dust collection attachment. That is really swaying me to get one.

@garrett1812 @wcs39204
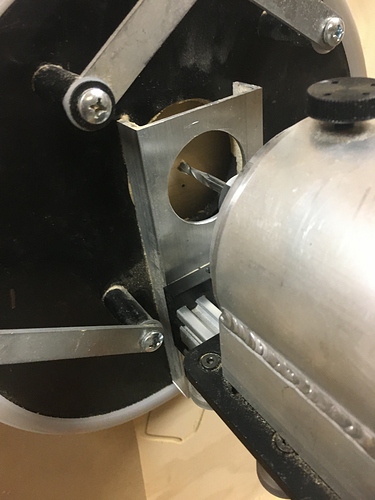
Here’s some pics of the dust chute that comes with @Metalmaslow. I am using the MetalMaslow upgrade kit for the Ridgid router and have the large gantry plate (not the narrow plate that @wcs39204 mentions). You can see in the Top Angle View pic below where the gantry plate movement is limited by the linkage spacers alignment with the edge of the gantry plate. I agree with @wcs39204 that the smaller gantry plate would be better for chain alignment and less restricted z-axis movement.

Would be nice if someone (hint, hint) with good 3d drawing skills would render a 60 or 90 degree 1-1/4" to 1-7/8" shop vac hose adapter! I could then see how well it prints on my new 3d printer!

Top view:

!

Side view:

Top angle view:

Thanks for the pics! This isn’t even shown or mentioned on the metalmaslow webpage. I do see the plate size issue. I think I’ll be ordering one soon. Going to wait to see how my 12’ metalmaslow top bar turns out. Also need to decide if I will go with the Rigid router or the Dewalt 611.

Getting the sprocket on the motor to fit snugly, but not too snugly, on a calibration aid was a bit of a challenge for me.

When I was setting up my Maslow, I didn’t have a 3d printer but did have access to a small cnc router. Here’s the part that made to find 12 o’clock that has a snug fit: Easel Link. The part is based off the info in this Maslow forum thread by @c0depr1sm. I modified the hole for the level to fit these vials from Amazon.

I also looked at these calibration aids on Thingiverse, but didn’t have a 3d printer at the time, so I can’t personally vouch for their fit.

@garrett1812,
I have lots of hours on the @Metalmaslow sled with a Ridgid router. I am pleased with its performance, but a smaller, lighter router is a better choice IMHO.

Does the router need to be removed from this sled for changing bits? I would guess so with the dust collection box. The rigid router mounts in with thumb screws to easily remove, but the Dewalt uses a few screws, which is a bit more of a hassle.

I usually change the bit by taking the router out. There’s plenty of room to change the bit with the router in the sled, but it’s hard for me to safely and comfortably get leverage on the collet wrench if it is still in the sled. If you have a router that uses 2 wrenches for bit replacement like a Bosch 1617, it would be a piece of cake to leave the router in the sled for bit changes.

@btodcox haha nice subtle hint! I’ll see what I can come up with! In the meantime tho, I have a question. You didn’t have any issues with COG with the stock spacers under the linkage? Mine kept tilting towards the bottom of the sled. Like, the front of the sled was lifting, so I had to buy spacers to raise the linkage. Which is why my wide plate didn’t work. Interesting indeed.

I even took the router clamp out and lowered it on the plate, and still no joy. I could CUT, but there was no way I was going to plunge .8" deep into a 3/4" sheet of stock.

1 Like

@buhlig I did, the sprocket and the tab are vertical in the 12 o’clock position. I will measure my tape measure end, and try to come up with a universal tab to fit all tape measures. I’d also like to make it 3 sided, so the tape won’t slide up or down. I’m a one man show too, so your idea for this design is actually a great one.

2 Likes

you are a star! :+1::+1::+1:

1 Like

@wcs39204 - I too struggle with the COG on the Metalmaslow sled with the Ridgid router. A really good engineer I used to work with said “you sometimes have to stand on your head and whiz in your boot to get somethings to work.” This felt a bit like that!

Three changes were helpful:

  1. Changed the slope of the default frame. I started with the @MakerMadeCNC jumpstart bundle and built my frame to their nicely detailed instructions. The known problems with the standard Z-Axis arrangement led me to the @Metalmaslow sled purchase. Somewhere on the Metalmaslow website or in the monstrous Metal Maslow thread I remember reading reducing the slope of the frame to 10 degrees. Rather than rebuild my frame from scratch, I removed the spoil board, added a 2x4 along the frame where top of the spoil board used to be, then reattached the spoil board. As a side note, this mod decreases the distance between the chains and the spoil board. Here’s a pic of the frame mod:

  2. Somewhere in the readings mentioned in 1), I found a note that said raise the Ridgid router as high as possible in the clamp and I originally had the router engaged as far as possible in the clamp. Raising the router in the clamp causes the COG to be a bit lower when the bit is engaged in the material. I do still see the sled tip back when the router is raised to its safe traversal distance. Pic showing about 1/4" of router protruding below clamp:

  3. When installing a router bit, I typically bottom out the bit and then lift it slightly before tightening the collet. To balance the extra distance between the router and material as result of 2) along with the previously noted interference between my large gantry plate and the linkage spacers, the bit is now about 1/4" from bottoming out in the collet.

It’s not perfect in this state, but it is workable. I still think my long-term sled solution is a Meticulous Z-Axis based on aspects of my current backlog of projects. However, I needed to get some holiday projects out ASAP for the WAF of my newly diagnosed CNC Router OCD and the Metalmaslow has quickly gotten several projects completed!

Here’s some measurements of the current adapter I am using:

OD at top: 1.20"
OD just before widening to larger diameter: 1.285"
ID at bottom of pic: 1.775"
Sorry, don’t have a deep throat set of calipers to get the taper on the ID of the wider section of the larger diameter.

THANKS!

1 Like

@btodcox I think maybe we’re twins, separated at birth some how. LOL We share almost this exact experience. I go the EastBaySource kit, built my frame, calibrated, was happy. Router base caused all kinds of issues, and I was literally nervous for it’s longevity. So I upgraded to the MetalMaslow sled as you did. Had issues, but got them mostly solved and it’s working like a dream. Thank you for your detailed photos and walkthrough! I may try the 2x4 trick myself. And much like you, I’ve been eyeballing the Meticulous Z as well. I think where we differ in that aspect however, is I’ve actually built mine, just needed to print the lead screw nut clamp and possibly the router clamps. It’s a 99% working sled at this point, just need to finish the small details. My reasoning behind STILL wanting the Meticulous Z, is I like the adjustability of the ring much better than adding spacers to the linkage. If that makes sense.

MetalMaslow said ‘use the washers to raise it up’ but after 8 washers underneath each post, I decided to go to the hardware store and get some steel hollow spacers in the height that I needed, and that has solved 95% of my COG issues. I still see it tilting everyonce in a while on the top corners and top center when It’s plunging after a tab.

  1. Changed the slope of the default frame. I started with the @MakerMadeCNC jumpstart bundle and built my frame to their nicely detailed instructions. The known problems with the standard Z-Axis arrangement led me to the @Metalmaslow sled purchase. Somewhere on the Metalmaslow website or in the monstrous Metal Maslow thread I remember reading reducing the slope of the frame to 10 degrees. Rather than rebuild my frame from scratch, I removed the spoil board, added a 2x4 along the frame where top of the spoil board used to be, then reattached the spoil board. As a side note, this mod decreases the distance between the chains and the spoil board. Here’s a pic of the frame mod:

it’s probably better to adjust with the legs (cutting the front, extending the
rear) rather than tilting the spoilboard like this. The sprockets are still
mounted at the old angle on the top beam, so you are introducing a 5 degree
error between the angle of the chain and the angle of the sprocket, that’s at or
above the design limits for the sprocket and chain.

good to know that 10 degrees works better than the stock 15 degrees

  1. Somewhere in the readings mentioned in 1), I found a note that said raise the Ridgid router as high as possible in the clamp and I originally had the router engaged as far as possible in the clamp. Raising the router in the clamp causes the COG to be a bit lower when the bit is engaged in the material. I do still see the sled tip back when the router is raised to its safe traversal distance. Pic showing about 1/4" of router protruding below clamp:

low CG can work, high CG can work, what matters is that the chain mounts
(linkage) match the CG and that the chains are parallel to the workpiece)

David Lang

P.S. please chaing the subject or make a new thread when you change topics, I
had stopped reading this topic and almost missed this.

Had a thought for the tape measure alignment tool @buhlig and @wcs39204 are kicking around. First, sounds like a great tool and would be very handy. There is another 3D printed tool I have seen where you imbed a spirit level piece and use it to set the sprocket at 12 o’clock. Sounds like you could combine the two to make it twice as functional. Either add the spirit level, or make a long side that you could hold a small spirit level against.

1 Like

actually, what works really well is a very small magnet in the base that lets
you attach a level to one link.

I posted links to some that I got cheap on Amazon that work well.

David Lang