So I got the kit about 11 days ago, but, other than doing some sub-assembly, setting up the electronics, and downloading the firmware and software, no real progress was made until about a week ago. My shop is at our “escape house” about 200 miles from home, and this was our first trip up here this year.
I had studied all the frame plans, and liked features from various builds… The default frame is straightforward and solid, the bolt together is pretty much the same, but uses bolts for the main joinery, and the 80/60 addresses add-on panels to help keep the sled flat at the panel extremes. I have done a lot of “glue and screw”, so I went with the default. To this frame I added wheels, and the ability to add the “filler” panels around all 4 sides…


The default frame design is really well thought out, a tribute to the collective of many forum members. Kudos to all! A highlight was going to my local Home Depot, and finding some of the straightest, cleanest 2x4’s I have ever seen (I mean ever!) The were framing grade, so they were a few dollars more, but well worth it. All the 10’ pieces were “top beam” quality! For the wheels I added a 2x4x8 to the back feet (all feet cut flat to the floor) and a 2x4x10 to the front feet (10 footer on the front to add the side filler panels if/when needed). The 3" wheels are rated medium duty, are locking, and also came from HD for $7 each. Wasn’t sure whether the locking feature was needed, but it turns out the answer is “yes!”, at least for the front. Having an unmovable target for the 4x8x3/4 ply is pretty useful. The finished machine loaded with a 4x8x3/4 ply has got to weigh close to 300 lbs, so maybe heavy duty was the way to go, but so far so good.
Adding the front filler/skirt panel necessitates cutting off the 2x4 panel supports that are part of the default design… it is really important that the panel supports are as square as possible to the top beam, so plenty of care was focused on this part. For me, the final dimension at the bottom from the vertical frame 2x4’s is 3/4" for the backboard, plus 3/16" for the waste board (seems like 1/4" ply is really 3/16"), plus 3/4" for the project board… thus, 1 11/16" is the target depth of the front sill that the permanent backboard, waste sheet, and work-pieces ride on. For cutting 1/2 inch sheets, replace the 3/16" waste board with an 1/2" sheet of particle board. Note that the thicknesses of these materials vary a bit, but the above is a good start. After the proper “packing out”, a 8’ x 9 " x 3/4" sill was added to hold the work piece and act as the bottom filler/apron.
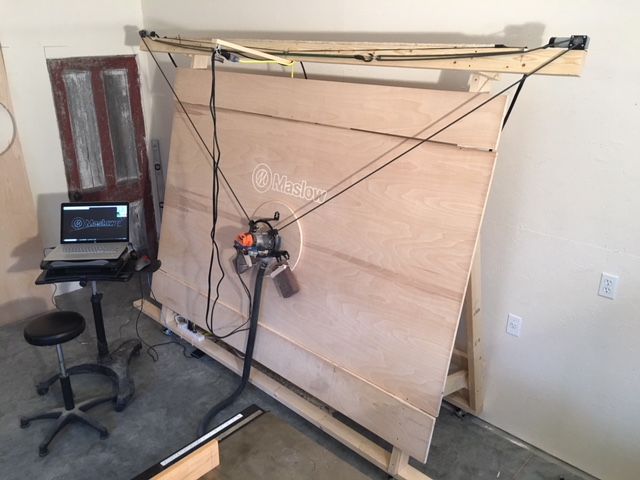
The temporary sled went pretty much as detailed. Adding the Z axis motor was also straightforward. I am using the default Ridgid router, and getting reliable movement with the motor will take study, fiddling, and time. There are several threads on this topic. There is no sense in putting this task off, as getting this thing to work correctly is essential. In my case, filing, polishing, lubrication, and locking clamp adjustment were necessary. Add a 15" bungee to the set-up, and all is good…

Hooking the bungee ends to the very back of the ring and securing its center with a short screw to the top of the router has caused no problems so far.
The calibration is another story in itself, and in my case took 3 or 4 attempts. In the process, I got pretty familiar with the software, and began to understand how all of this works. The first attempt at cutting the final sled came to a halt 3/4’s done, when my laptop went to sleep and powered down the connection to the control board. (Note! Turn off all power saving functions on your computer!) Here is the final sled…

I misread the instructions on how to string the elastic for managing the loose ends of the chain. Thus, they were too loose, and caused a serious chain skip while trying to cut the calibration marks at the end of the first calibration routine. This was the cause for the first calibration repeat. The loss of power was the cause for the second. I had problems with ground control after the power loss, and had to calibrate again once things started working correctly. My present calibration is not quite perfect… I have run several tests cutting 6" circles all over the waste board, and they are mostly perfect horizontally, but vary in height from 1/8" narrow near top center, 1/16" at center bottom, and 1/32" narrow near the bottom to the left or right 2 to 3 ft. There are other threads addressing this issue, so for now i am watching.
In anticipation of getting the Maslow, I prepared some files for making a workbench. The design is taken from plans I bought from Ron Paulk (www.paulkhomes.com). I used Easel to create these files, and also converted them to G-code using this program. Easel is pretty user friendly, and I recommend it to those who may be like me, pretty clueless to the Cad/Cam process. After all this build and set-up time, I just needed to actually cut something, so I ran the files for the folding sawhorses that support the bench…

Cutting these was a tutorial in itself… Although the file was set up to cut all 4 parts at once, I was not confident that my present Maslow was ready for a full 4x8 sheet cut. So I made a 2 piece file (Good Choice!) I quickly learned that the top filler board was needed, as the sled tilted a bit over the top edge, causing a slight line waver on the first pass (cutting 3/4" ply, 4 passes, each pass .2 inches). Pausing the process to fix this was easy. The slack on the chain ends was also problematic, and the loose ends where crossing and the links were catching, making me nervous about another chain skip. Somewhere in the forum I read about another member adding a bungee up there. Pause again, and scramble around, finding a 32" long flat bungee cord, which stretches to about 84". Seems worth a try, so up it goes, along with the unused chain guides from the kit…


This modification was HUGE!!! The loose ends are staying out of the way of the drive chains, which makes me less concerned about a possible tangle and chain skip. The placement of the guides needs refinement, I think. At the extreme top corners the drive chain may touch these guides, and cause a cut error. Needs more attention, but I am much more confident about the reliability of the Maslow after this upgrade.
All and all, this has been a most satisfying week… more hours than I care to admit, as there was much “stare” time, a lot of problems to solve, and a lot of exchanges on this forum… To all the those out there in the amazing Maslow community who responded and shared their experiences, I cannot thank you enough!
Keep on Cutting!!!