3d deep detail advice

Hi Everyone,

I am new to the CNC world, but have done lots of research. Currently prepping for my eventual purchase of an M4. My main goal with my machine is to design furniture and cabinetry, but I do also want to dive in to high depth and detailed carving for finishing and combining with epoxy pours. I wouldn’t mind some resources to play around with 3D detailing, and maybe some advice on planning out more detailed carves. I’m just gonna put my questions in-line, and thanks in advance for any input!

  1. Software. I don’t mind working towards paid software, but current budgets leave me at open source. I’m not fluent in CAD programs, but am a quick study. Are there better CAD programs for designing, sizing, and drawing 3D forms? Are there other programs that work better for testing motion and joints and tolerances? Are there programs that are more user friendly for integrating or creating heightmaps for deep detailed carving, or are less of a translation headache?

  2. Order of cuts. If doing a carve with lots of depth change (like a topographical mapping), do you have to plan the whole route and order of cuts? Does it make a difference working from shallow to deep sections, or vice versa? Is this a moot point because this is already addressed?

  3. Levelling tricks for fine detail. When cutting large deep curve-like reliefs, does it work better to have a board or track to keep the sled level? I’m considering situations where simply putting spare board against the plywood will not be enough to keep the sled flush. I’m also assuming whatever track or boards added that increase the z-axis height will reduce the total depth cuttable on the project. IIRC, M4 can cut up to 1.9" depth, which should allow cutting right through a planed 2*4 with a very thin sheet over top of the board to keep the sled consistent

  4. Bits. Beyond the v-groove, straight bit, ball-end bits, etc.,is it worth trying other specialty bits with CNC? For example, is it more of a bother to program or code in a dovetail bit channel or manually cut in finishing/framing/joinery details? Is it worth using 4-5 different shaped bits to cut out large details vs using a simpler bit and mapping out more passes? Is it tough to size out larger bits and where the router position needs to be for each diameter/shaped bit? Is it better to do more macro cuts and sand instead many shallow passes?

  5. 3D scanners. Has anyone used 3d wand camera scanners, and are there economical ones that could help in translating real world objects into carving projects and simplify the drawing process? For example, scan some of a kid’s favourite toy cars and track and then carve it onto ply for a permanent track that could integrate with say, SHot FWheels instead of lots of caliper work and trial/error?

Hope that all makes sense. Take care!

Edit 1: Figured it was better to leave here than add another comment. Does anyone have experience in “slicing” 3D projects so that larger form 3D CAD files can be cross-sectioned to a thickness the Maslow can handle, then glue together to finish? Is this something that the CAD programs I’m suggesting above can easily do or is this much more labour intensive? I love the ingenuity of many craftworkers I’ve explored in this forum, and I want to head in the right direction to reduce my learning curve for my big ideas :grin:

I think this is your biggest issue. The Maslow has a sled that rides on the
workpiece instead of a gantry. This is a wonderful thing to let it scale, be
cheap, and be simple to setup, but it means that if you cut away too much of the
surface, the sled is going to fall into the cut and your depth will be relative
to that new surface (and you may not be able to move out of it)

if you use a bigger sled you may be able to span the area you are cutting on,
but short of adding rails (at which point it’s really questionable if you
should start from a maslow and modify it, or just build a coreXY gantry machine
instead) there’s no good way of carving out a large area.

David Lang

2 Likes

Thanks for the quick reply! I know this is very situational, but it sounds like If I wanted to make a large area deep carve that splitting the job up would be more successful?

For example, if image is a 3’x3’ area, varying depth down to 1.75" max, I’d have more success carving 2x(n) lumber section by section (with other 2x4s surrounding each section in order to keep the sled level) and gluing them together like puzzle pieces after they are all cut, rather than stacking plywood to the same thickness and trying to cut as one full image. This is ignoring the other factors such as hiding seams and grains/layers, but still…

I also thought of partially cutting the image, then place a 1/8" sheeting over the material to hold the sled and finish the rest of the image, adding in an extra 1/8" depth for those sections. These ideas still seem more economical than building a gantry system, but certainly a trade-off.

I am very frugal with materials, as I have more time than moolah. If I have more than one way to accomplish it with reasonable success and minimal wastage, all the better! :smiley:

please diagram what you are thinking here. unless you have lots of fairly small
sheets that you are adding (and note that you have to have full height features
to attch them to), how are you going to cut in a large area?

I may be missing something, but I’m imagining something like cutting a 3d map,
it doesn’t matter how many layers you try to cut it in, some areas are going to
have the entire surface cut out and the sled will no longer have something to
ride against.

Excuse my freehand drawing skills, I’ll explain as best I can. None of this is a real project, just something for context. At the top is the project with blue labelled axes from a top down xy and horizontal xz perspective. Essentially a topographical design, the red boxes are cars or other objects at various heights, the green is the hills, etc. I just wanted to show varied depth on a large scale.

The number 1 is my first method example. Instead of cutting through a piece of wood that is the full size of the project, I would cut sections of the full project in strips, such as on independent 2x4 or 2x6, or in clusters, like when TVs are linked and slid together to make a “jumbo screen”. I would keep the same size wood surrounding the cutting area to keep the sled flush and level. That strip (in this example, we are cutting the second top strip of the project identified with dark blue rectangle) would be put aside, and repeat the same steps but with another one of the light blue sections. Once all the strips of wood are cut I would then place them next to each other in the order that completes the final image and glue together.

The number 2 is my second example, where a thin sheet of material is placed over the piece of project wood that is the same size of the project, or large enough to keep the sled from falling into the cuts. It might even need to be multiple sheets, exchanged whenever too much of the top sheet has been cut away and no longer supports the sled. It could also be two thin metal strips, arranged in a similar way from method 1, but placed directly on the project wood for the sled to sit on. Project is still cut in sections, but sheets are repositioned and router repositioned until all sections are cut out. Problem is that now depth of cut must add the thickness of the track/wastewood into the coding to get the proper depth (plus more waste and less max cutting depth for project). In this case, I mention 1/8" because if I wanted to cut all the way through a 2x4 and only have 1.9" cutting depth that’s all I pretty much have left.

Finally, number 3 is what I’d call cut/fill/cut. No tracks, just cut sections in a way that the sled can stay level (in this example the green highlight is vertical sections to be cut. Once the sled doesn’t have enough surface to stay level, I would backfill the cut sections with a solid fill that could be removed. I’m thinking plaster, levelling compound, something that can stay in place and keep the sled level while the rest of the project sections are cut out and then peel it away when finished. This would also involve a lot of waste materials and time/effort so probably not a good option.

And if I did cut sections at a time, would that involve a ton of alignment issues and really obvious seams that take more time to fix than to calculate once all the pieces are pushed together? Sorry if this is confusing, hard to explain with terms I don’t yet know.

Ok, now I understand what you are suggesting, it seems like a huge amount of work, and most maslow setups don’t have that much Z travel (a total of ~2", some of which will be used up depending on the size bit you use)

If this is the type of work you want to do, you really want a gantry based machine with a lot of Z travel.

1 Like

Fair points for sure. It’s not my primary purpose for the unit, but was curious about the workarounds to give it a bit more versatility. Thanks :grin:

@CGDrummer your 1st method is similar to what some CNC CAD/CAM programs call tiling and is basically used for lager jobs to be cut on smaller machines. It takes some practice to get it figured out and you need pretty good precision to get it to ensure your cuts align in the correct manner. Can it be done with the Maslow, I’m sure it could, but as @dlang has already mentioned, when doing 3D relief carvings, a lot of material can be removed, causing the surface the Maslow rides on to diminish, and can cause a failure. This is the #1 reason I bought a second CNC that was a gantry machine so I could do 3D relief carves as it was something I wanted to add to my capabilities. I can say it cuts way faster than the original Maslow (nothing against that), and I have still had cuts that will last 4+ hours on that (both roughing and finish passes each) at approx 100IPM (rough) and 150IPM (finish). 3D relief carves just take a long time, and it increases exponentially the larger the project is.

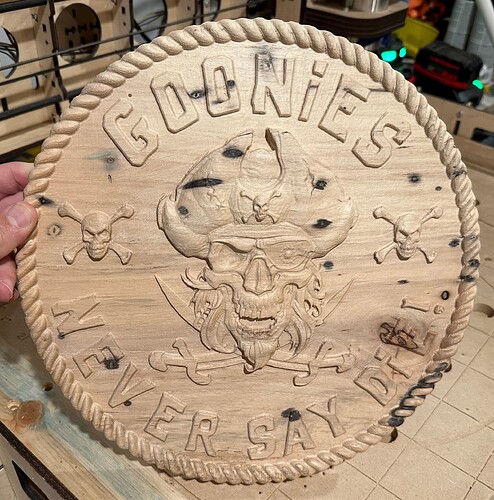
This is one I did recently for a friend of mine. Measures around 12in across, and about 1in thick (started with 1.125in stock). Rough was about 2.5 hours, and finish was 4-ish hours IIRC. Was done in Pecan.

2 Likes

Was the Goonies done on the maslow? Would you be willing to share your files?

Unfortunately, it was not done on the Maslow as the size and depth of cut needed would not be supported by the sled, and it would have taken waaaaaayyyyyy to long (even with my Meticulous-Z I have set up). I wouldn’t really mind sharing the file, but it was a paid file, and I need to check with the site that I purchased it from to ensure I would be able to. It was not my creation and I do not want to cross any lines by sharing. I’ll get back to you on that as I figure it all out.

All good, I would not want to get you in trouble.

I always thought about widening the surface area of the sled to handle big gaps for projects like this by using some aluminum angle iron and 4" furniture sliders. Bolt a few feet of aluminum stock to the sled to have 4 “legs” extending out and furniture sliders on the other ends

Usually you just share a link to where you can purchase the design where that’s a concern

I did look into it, and I can’t share it, However, as @mooselake said, here is the link for the file:

I’ve purchased a few of his files before, and they were all very good quality.

1 Like

Awesome! Thanks

Ej’s site has DMCA warnings all over it, with no mention if you can use the files and sell the carvings that result. There are also a number of files containing copyright material like Mickey Mouse and other Disney characters, and Goonies are a product of Warner Brothers. No licensing mentioned for them that I could find although it could be somewhere else on the site

They look like good work, but the way all the warnings are plastered all over are concerning

As someone with a LOT of experience regarding copyright and licensing, I can assure you he does NOT have license to sell these things.

Disney is notorious impossible to get a release from, as the amount they want is FAR above what any non multi-million a year business could afford, not to mention they have VERY strict quality control procedures on things that are licensed.

The entire reason he says you cannot use them for anything but personal use is because if you were to use it commercially and sell it and someone inquired with Disney he would be sued out of existence.

In fact if anyone was to send a letter to WB, Disney, or any of the other IP holders he is ripping off his site would be gone that same day.

The ONLY way he could get away with this and not be in legal danger himself is if he is in china or another country that doesn’t respect IP laws, or if he was producing these only as custom requested commissions and NOT listing any of it, or images or it, on his site for sale.

Legally at most he could show these images as past commissions with a note that these are not for sale, but a custom made version can be commissioned, and then he cannot list prices charged based on those past works.

He does NOT own copyright over any of this, only his horrible website layout.

The AOL email address should have told you all you need to know :wink:

2 Likes

If I might add I know what your driving at and agree that the Maslow would not be suited for this type of operation. Your right a raised gantry would be ideal for this particular project.
You might use the Maslow for certain aspects of the job and a regular xy gantry type CNC for this topigraphical type cutting).
One consideration could be hot water beads that dry like a clear gel, or something like play dough that would level the sled but you’d have to experiment. The beads are not expensive you can get them on Amazon or Alibaba or eBay. They also have something called poster putty. I picked it up in the art section of Dollar Tree.
Happy carving hope this helps.
The two I would go with would be poster putty or play dough . The beads could be used but you would have to wait till they dry.