
Hi All, My first post. I wont apologize for my questions as I’m in the “no judgment zone”, but would like to say BIG thanks to everyone who contributes to the forum. With family & work commitments, its taken me about 6 months to get to this point of a finished, adjusted frame, balanced motors, chains and a smooth working temp sled. For sure a lot of frustrating days (and nights), steps forward, steps back etc but finally feeling pretty good about where I am at with the project. The forum has been very helpful getting to this point. I added some pics but im not sure if they are visible?.
some project notes:
-
List item
I adjusted my metal frame several (many) times in different places to get a VERY flat work surface. Im now at almost a zero depth difference anywhere on the back support. (+/- .25mm) This was a critical step in getting repeatable smooth calibration cuts on my test OSB sheet. -
List item
I added lengths of rubber feet onto the bottom of the unistrutt legs (using pieces of an old rubber cable trough) and added cinderblocks - for less vibration and more weight at the base of the unit. -
List item
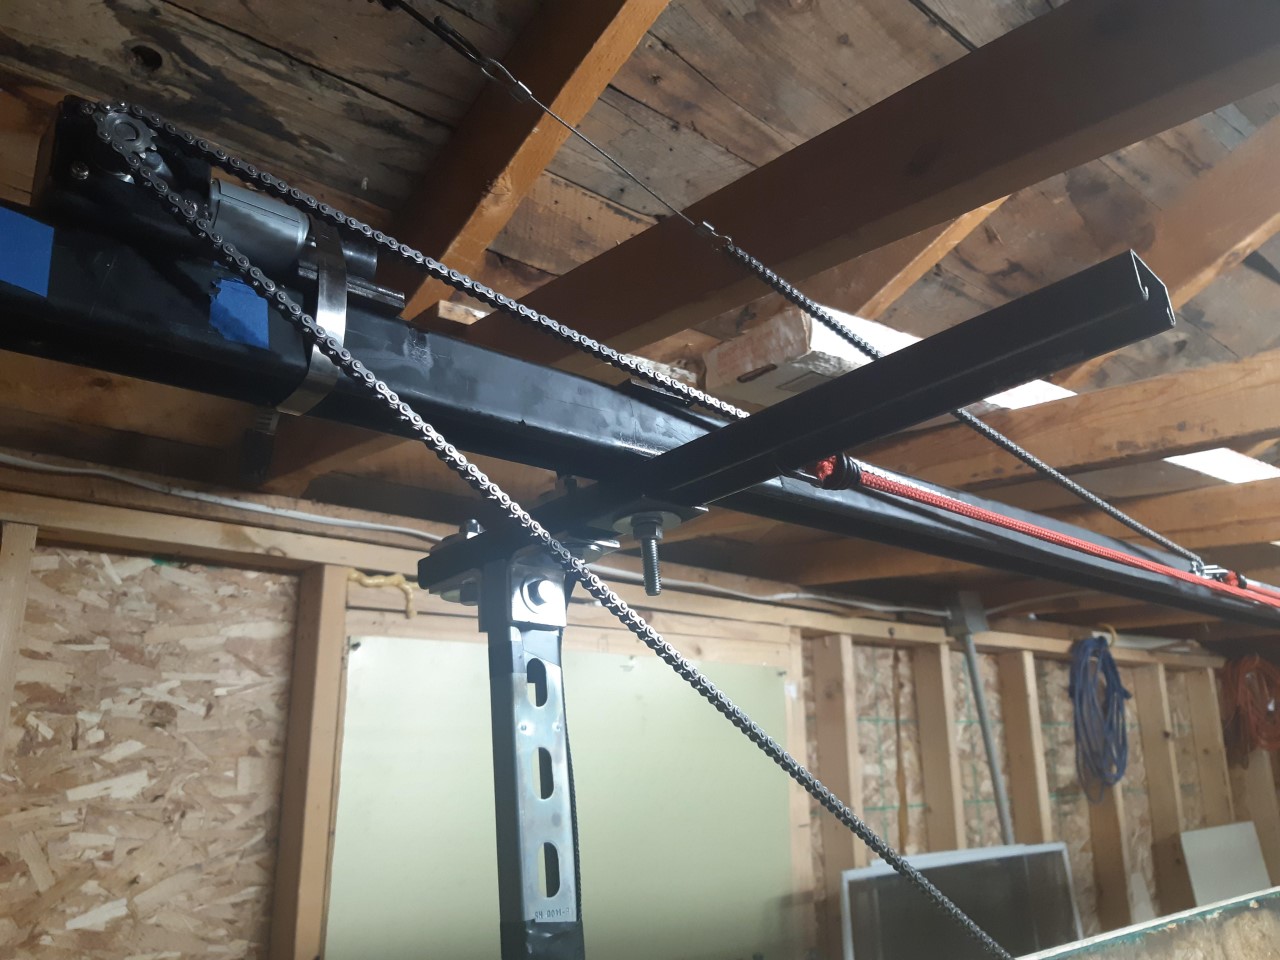
I had to rethink my chain support and chain runners on this project. For some reason this was a big sticking point for me as I could not get my chains and cogs to run smoothly using the suggested (one end of the chain fixed to the frame method). I was always getting too much (or not enough) tension and as a result the chain was always being unevenly guided on and off of the cogs. resulting in random snagging and jumping of teeth. After some experimenting I came up with a floating system using 2 bungee cords that provide the correct tension at all times on the chain no matter where the sled is on the work surface. This100% got me past the snagging issues and actually added an increased smoothness to the machines operation. I also lightly re oiled the chain after handling it so many times. -
List item
I used carriage bolts to attach my router to the temp sled and countersunk the carriage bolt heads to the underside of the sled with approx. 1mm or so of the bolt head sticking out. This helped glide the sled over the worksurface in a smoother manner as opposed to the friction of wood on wood. I realize I may or may not need this when I cut the actual sled from smooth MDF and use a smoother finished wood sheet for my project pieces.
My question relates to the work surface and the calibration cuts - Im using mostly the default settings and using the motors to calibrate the chain length. So using the following measurement’s:
Chain length 2978.4mm
Default work surfaces 4x8’
Motor offset 374.65mm
Default sled measurement’s of 310 / 139 / 79mm
(with the router turned off but the bit following in the channel)
I an getting repeatable precise calibration movements of:
OE of Cut 1 to cut 2 1930.4mm (6ft 4")
OE of Cut 3 to cut 4 1930.4mm (6ft 4")
OE of work surface to OE of cut 5 346.075mm (13 5/8")
Do I need to calibrate the test cut area to reach to the same area I want to cut within on the 4x8 sheet?
When I use the manual control arrows of launch control, I am able to take the sled to all 4 corners and along the edges of the 4 x 8 sheet. (as close as i can without the sled falling off) but the calibration cut will only cut to the dimensions mentioned above. Should the calibration cuts cover the same area as the area I want to cut within? or is the calibration test cut unrelated to any sizing a g.code file might have at this point.?
Testing the calibration size without a router bit - If I increase my chain distance in the maslow settings (ie from 2978.4 to 3678.4 and manually reset my router to center, the router WILL cut within a larger area L to R but I loose the cut height.?. Am I overthinking this?. Its taken me so long to get to this point, I’m worried about damaging the machine or that I’m now still missing some steps?. Hope this is making sense. Thanks in advance for any input.
 that i was expecting such a literal translation from the calibration image show to the actual calibration cut. ( cut distance from the edges)