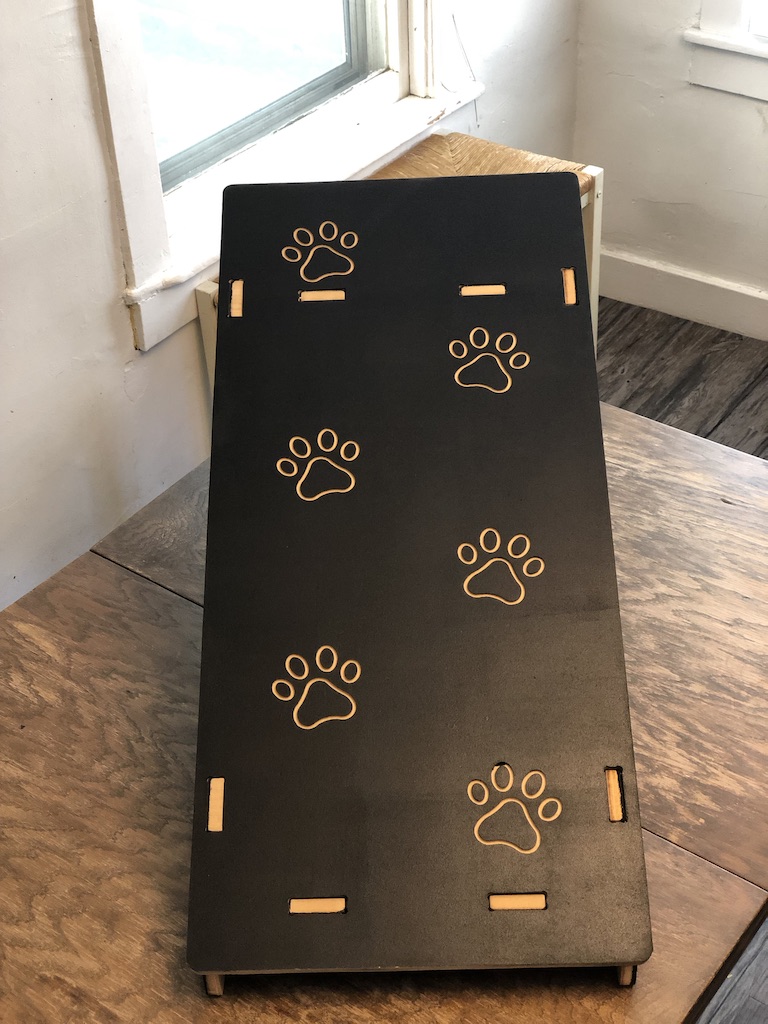
Here is my first cut project after building the sled and Meticulous Z axis upgrade (still need my dust chute) I made a ramp for my 6 year old Basset Hound Rosco to use while he is recovering from tweaking his back. On Dr.s orders of no jumping or running so this will help him a little. 1/2" MDF (well that cuts way different than ply. broke a bit) covered in a rubberized paint followed with grip texture paint. Ended up with out enough traction so I am adding a rubber nonslip pad to the top but here it is.
I also moved the bricks from the bottom location as I felt they were too low and off balancing things. I moved them up as seen in the pics which balanced everything nicely but caused the sled to rotate slowly requiring constant attention.I had to re cut a piece du to a broken bit and a crap chinese spare I had (never again) Final solution was to move the bricks back to the bottom but mount them perpendicular to the sled, worked great with a new bit and the relocated bricks.
At first I had the weights on the bottom below the Axis kit (pointed straight down) I felt they were causing too much drag and counterweight to the sled making it off balance on the lower end of the cutting area. I moved them to the top to try and get a better balance and center of gravity. Moving them up top balanced great but caused the sled to rotate as it moved laterally. I did relocate them back to the bottom of the sled but positioned them perpendicular to the axis kit, this removed the potential for rotation and did not off balance the sled or mess with the center of gravity (I just didn’t have a picture of the final arrangement).
a skirt on the bottom of the machine will solve the balance problem at the
bottom of the workpiece.
Early on we talked about making the sled balanced around the bit, but we figured
out that we needed the sled to be off-balance to resist the torque of the
router, because if it rotates against the stops of the ring/linkage it will then
move the end of the chain so it no longer points at the bit and the effective
length will be shorter than what is calculated, which will affect the sled
location.
By chance do you have a picture to show us all on your weight set up now? We or I and my mate have a balance problem & I think what you have done might just fix our problem.
Thanks for sharing.
Swany
DL,
I have considered putting the skirt/border system in place but am considering how to make its depth adjustable to match varying materials. The sled definitely rotated with the weights in a balanced position, they now reside on the bottom but at a better position than before.
Swany,
Here is the revised location of the bricks, this location seems to work well with the Axis upgrade and dos not cause the sled to tip out of balance.
for the bottom, make the skirt an upside down L with slots in it so it can be
moved in and out to match the workpiece. mount it to a crossmember that’s flush
with the bottom of the work area. This will also serve as a support for your
workpiece.
My solution for the skirt: Skirt is 2x 1/2" plywood above the backer plywood base. I use either 1/4", 1/2" or layer both sacrificial plywood sheets to shim out the cut sheet material, depending on thickness of material I need to cut. I have not gotten around to using my machine yet, but the frame is built and the machine is operational.
Hi.
This is the problem we have as you can see in the pictures, Peter my mate has now put the router in place on the sled but there still is a balance problem I was going out to play with it today but he is as sick as a dog, with this flue we are getting in OZ & yes he did have the injection, but it has from the latest news mutated so now anyone can get it.
Hi Gero.
I have emailed Peter, so will see if he is feeling better to get a picture, I have asked him also to give me the best response for the ropes, they are extra weight.
ropes to the corners are going to cause you more problems (they will pull hardest away from the corner as that is the rope that will have the flattest angle
get the router on the sled and see how it balances, adjust the height of the ring so that it hangs straight.
THEN check the angle of the chains compared to the frame and either adjust the position of the top beam or the thickness of the wasteboard to get the chains level.
Hope your mate gets well soon.
Yes, you want to keep the screws that connect the tall brackets to the ring loose, so the ring can slide up and down all three brackets a bit as the angles change as it moves across the surface.
Btw. there is a troubleshooting board in the forums. Good luck!
no, the ring should not need to move up and down as the sled moves around. You
want the ring at the height that balances the ring. Then you want to make the
chains level with the workpiece at that height. Once the chains are level, there
would be no force to move the ring up and down on the brackets, so no reason to
have them loose.