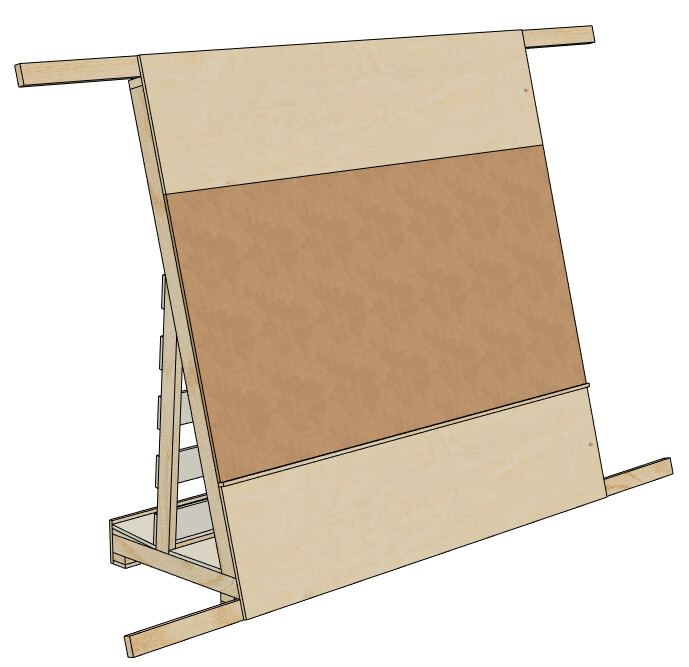
when not in use, my Maslow4 will need to be stored where I currently have my stock of sheet material. I have been wanting to build a storage cart to make it easier to access my stock but never got to it. with the Maslow4 expected in a couple of months, this is the perfect time to solve both problems at once: a cart that doubles as Maslow4 frame on 1 side and sheet material storage on the other.
general requirements for a full size “near vertical” Maslow4 frame:
work area 2.440x1.220mm (~8’x4’)
working plane angled min 15deg wrt vertical
anchor points at 600mm (~24") from corners of workspace
as stiff as possible, no deformation of anchor points wrt work area (whatever that means)
my requirements:
work area 2.500x1.250mm (standard birch plywood sheet size here in Europe)
max height 2.450mm (when not in use)
max width 2.500mm (when not in use)
easy to move around (wheels)
space for 10-15 full 18mm (~3/4”) sheets on the storage side
nice to have: space for additional storage and/or shopvac and/or cyclone seperator in between storage & CNC
basic idea:
a skeleton out of 38x89mm (~2x4") SLS timber (softwood)
connected with screws and woodglue (maybe domino dowels for additional stiffness)
4 A-shaped crosssections angled 15deg on CNC and 5deg on storage side
connected with longitudinal beams on top (1) and bottom (2)
sheet material screwed and glued to the skeleton (adds shear stiffness)
hardwood plywood on top and bottom of work area
low density MDF on the work area (spoiler board) - not glued
melamine or HPL faced board on storage side to make sliding sheets in/out easier
detachable horizontal beams for the anchor points
optional detachable skirts on L&R sides (adjustable to flush with workpiece) for sled support when cutting up to L&R edges of workpiece
optional detachable skirts on U&L side (same thickess as workpiece) for sled support when cutting up to upper and lower edges of workpiece
TOTAL ~250€ (excl VAT), assuming I buy everything new which won’t be needed as I have at least half of what I need lying around.
comments welcome!
I am especially interested in whether you think this design will be stiff enough. there are plenty of options to stiffen it up but that will add weight and cost so if not needed I’d rather not.
switch to 45x89mm sections for the skeleton
use more than 4 A-shaped cross sections
add sheet material on the back of the frame to get a real torsion box
…
I doubt the anchor attachments are sufficiently stiff in the current design. the largest belt forces will occur with sled in high position so forces will be close to the axial direction of the beams, which is beneficial. in fore-aft (perpendicular to the work surface) it should be fine as well (small angle of the belts so small out-of-plane forces). But, I am worried about vertical direction. could add 45deg support beams there or a connection between upper and lower beams (as the forces will always be opposite) if needed.
I have 4 swivel casters with brakes lying around, total height 79mm, load capacity 300 kgs. most casters with comparable load capacity will need more height.
design is in Fusion360, fully parameterised so can make changes easily. when more final, I will be happy to share the fusion file (if I can figure out a way to do that)
Beautiful design! I think it should work quite well.
I think that you are right that this is likely the biggest weakness as built, but it might be sturdy enough as is. Are the changes that you have in mind things that would need to be done before building it, or would it be possible to build it as is and then reinforce it further if needed?
That plywood storage on the back us very clever. I’m a little jealous of that. If you could fit the dust collection in the triangular space you would have a very nice fully self contained system.
except for possible the arms that hang out, I think this will be pleanty stiff enough. I wonder if a torsion box with a light (1/8" hardboard, 1/4-1/2 plywood) would be lighter or heavier than several L frames
I the biggest potential problem is the long beams flexing, but you should be able to add an angled brace after the build. (are you intending those arms should be removable for storage? that would complicate things a bit, but you could still do it if you use thread inserts to tighten things down)
If the frame itself would be too weak, I’d need to fix that before I start building (using a larger section lumber for the frame and/or add A-frames basically means starting from scratch once it is screwed and glued together).
If, as we all seem to think, the main structure is fine but the anchor beams might not be, that could be fixed afterwards but I think I will already beef them up anyway (larger section and/or angled brace).
I am pretty sure a small cyclone separator like the Oneida dust deputy DIY + a dust bin will fit.
I no longer want my shop vac inside as I use it all the time with other machines.
Others could easily create more space e.g. by increasing the Maslow angle to 15->20deg, the storage angle 5->10deg, making the storage side higher, … but it’d like to keep it as compact as I can.
I agree and, yes, for me they should be removable. As they can be attached to both the top beam of the frame and the upper plywood sheet, so I don’t think it will be much weaker than permanently fixed.
Currently thinking about
interior doors are a good suggestion as they are basically torsion boxes.
for my design, the dimensions didn’t really work out, unfortunately.
here in Belgium, these doors come in 2.015, 2.115 or 2.315mm high by 630-1.230mm wide (in steps of 50mm).
2.315x630 would be perfect to use on left and right side but, in that height, they only come in 830-930 wide .
as the solid timber frame around these doors is only about 30mm wide, you can’t really resize them as you end up with 2 thin hardboard layers with air in between, not very stiff
have been thinking along that line for the next version …
those are about the sizes available here in the US as well. The 630mm wide ones
are just about perfect for the sides, but they are a little shorter than ideal
(although, I expect they are the normal height for residential doorways). In
theory that’s a little shorter than you want, but not by a lot, put the
workspace offset a bit towards the bottom (you have gravity working for you) and
I think it will work pretty well (can’t know for sure without someone trying it)
As for resizing them, you can get a thickness planer and plane down a 2x4 to
fill that gap, then glue it between the hardboard layers. Just hammer it in to
push the cardboard out of the way.
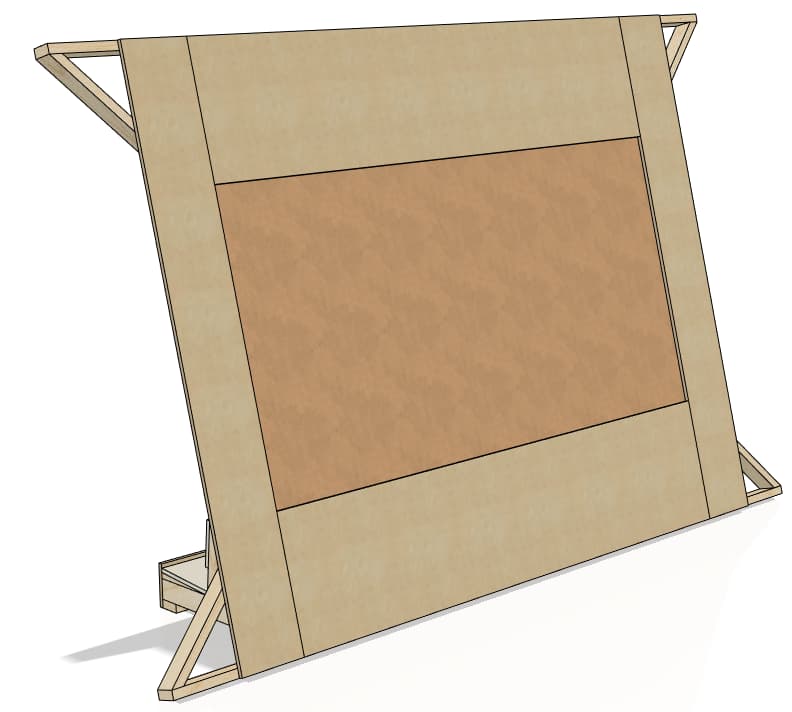
I found some time to work on a next version of my frame design:
the main skeleton has not really changed, still around 2,500mm wide x 2.500mm high (~4’x4’).
1 thing I changed is to set back the MDF spoiler board by 18mm wrt the upper and lower plywood sheets so these can double as frame stiffener and skirt (as long as the workpiece is also 18mm of course but that will the majority of what I will be cutting).
I added side frames, each around 600 wide x 2.500mm high (~2’x4’) on left and right sides, stiffened with angled braces and plywood (which also doubles as skirt).
the sides attach to the main frame with hinges so they can be folded back for storage.
I only want hinges on the level of the upper and lower skirts, not right next to the workpiece so I can’t cut into them by mistake. so they will need to be pretty stiff but that should be okay.
the sides will be locked in place with a beam on top and bottom that attaches to main and side frames with bolts/nuts/… the anchor attachments will be connected to these beams.
if needed, I can add bolts/nuts to connect the vertical beams as well.
2 sheets of 18mm hardwood plywood (birch, maple, meranti,…) x 80 ~ 160€
1 sheet of 18mm low density MDF ~ 25€
1 sheet of melamine or HPL faced board ~ 40€
4 casters x 11,50€ ~ 45€
Screws, glue, dowels, hinges … ~ 50€
TOTAL ~370€ (excl VAT), assuming I buy everything new which won’t be needed as I have at least half of what I need lying around.
without the requirement to be able to make the frame smaller for storage and replacing the hardwood plywood by underlayment or MDF, cost will only be half of this, I guess.
that’s it for now.
thoughts, suggestions, … welcome!
You can resize with nothing but a saw. If your saw can accurately rip them just rip a strip off of any dimensional lumber. Make the strip width the same as the hollow dimension; it doesn’t matter how far it sticks into the door.
If you can’t get a fairly accurate rip then you can rip a bunch of strips out of plywood/hard board and then stack them up to the desired thickness. Shim the final thickness with paper between the layers if required.
Definitely, just a saw for honeycomb core doors plus a router to cut away the core in case of full or tubular chipboard core doors (which is what I would use here as well because they are significantly more stiff).
I have doen that multiple times when I needed a very odd size interior door.
But here, building with 2x4” and plywood seams easier and cheaper (and more stiff?) than going to the trouble of modifying the size of a door.
Unfortunately not yet.
I have been very busy last couple of months an haven’t found the time or space in my workshop to start building. So, I can’t invite you to ODK to check it out yet .
No problem to share the current status though.
Have never done that but I should be able to share my Fusion360 design online.
If you have F360 and are interested to use it as a starting point for your own design, that would be the best way, I guess I can also send you an offline copy, or export to another format, …
Let me know if you’re interested and how I can best get it to you.
Currently on vacation until sept 15 without my computer so can only do this afterwards.