Think of the situation where the sled is almost directly beneath one motor. Most of the force is on that motor.
1 Like
Yes, the max forces on the chain (when you aren’t moving) is at the top center
2 1/2 hours according to Google maps. If the Maslow wasn’t hanging above a busted up concrete floor (3 tractor buckets worth of pieces this morning!) I’d invite you over. Although the sledge hammer’s just sitting there ![]()
Having a good time at Pictured Rocks, and checked out the glass bottom tour boat yet?
IT LIVES!

So I made a mistake in measuring the router clearance, so sadly it won’t fit back in there without making some modification. The spacer blocks could also be nicer. It also has a few other issues that I need to fix, but I think all of these issues are easy to solve.
It seems to work really well. Here is a video of it sliding from the center to the side:
That black line was a prior test. It is extremely smooth, no evidence of any sticking. The line is extremely straight (the tape isn’t).
Here is a video attempting to show that it pivots around a central point when the sled is rotated:
Finally here is a video showing how easy it is to move the pantographs:
The construction was relatively easy. All of the plywood is stapled together. All of the bearing surfaces are nothing more than wood on threaded screws. Some of the joints are even tighter than necessary. But even with all those sources of friction, it still moves very easily.
Because of this simple design there is no detectable slop in the system.
My main concern, is that while this was easy for me to construct, I used a table saw, miter saw, and drill press to get the accuracy needed.
Anyways, I am going to spend some more time playing with it tonight. Hopefully I can implement the fixes tomorrow and get the router back on there.


13 Likes
Good job!
Since I still have to put my Maslow together, watching the developments here closely 
1 Like
Great job! I wonder whether the weights should be symmetrically arranged with that lashup?
I thought about that too. I might try it, but I don’t think it matters since it rotates consistently around the center. Although, perhaps if there is any inaccuracy in the center it would be better if the potential for rotation was decreased.
1 Like
Great work! To give it the longevity and wear reaistance needed, the
screws should be inserted in metal sleeves attached to the wood, rather
than inserted directly in the wood.
krkeegan[1]
August 27
IT LIVES!
IMG_20170826_164926
So I made a mistake in measuring the router clearance, so sadly it
won’t fit back in there without making some modification. The spacer
blocks could also be nicer. It also has a few other issues that I
need to fix, but I think all of these issues are easy to solve.> It seems to work really well. Here is a video of it sliding from the
center to the side:> YouTube
That black line was a prior test. It is extremely smooth, no evidence
of any sticking. The line is extremely straight (the tape isn’t).> Here is a video attempting to show that it pivots around a central
point when the sled is rotated:> YouTube
Finally here is a video showing how easy it is to move the
pantographs:> YouTube
The construction was relatively easy. All of the plywood is stapled
together. All of the bearing surfaces are nothing more than wood on
threaded screws. Some of the joints are even tighter than
necessary. But even with all those sources of friction, it still
moves very easily.> Because of this simple design there is no detectable slop in
the system.> My main concern, is that while this was easy for me to construct,
I used a table saw, miter saw, and drill press to get the
accuracy needed.> Anyways, I am going to spend some more time playing with it tonight.
Hopefully I can implement the fixes tomorrow and get the router back
on there.>
IMG_20170826_164934
IMG_20170826_164948Visit Topic[5] or reply to this email to respond.
To unsubscribe from these emails, click here[6].
Links:
If the Maslow wasn’t hanging above a busted up concrete floor (3 tractor buckets worth of pieces this morning!) I’d invite you over. Although the sledge hammer’s just sitting there
Thanks for the offer, but we’re already heading downstate, so no sledgehammer fun for us! ![]() We trade off our time slot with my sister, so you have two years to get your system fully functional before we come to see it. My family’s been coming up since the 1920s.
We trade off our time slot with my sister, so you have two years to get your system fully functional before we come to see it. My family’s been coming up since the 1920s.
Having a good time at Pictured Rocks, and checked out the glass bottom tour boat yet?
Did the glass bottom tour last visit. This time we spent most of our active time hunting waterfalls.
I was completely wrong about this. The vector for the CG never changes in this design.
What we were seeing is that my CG was more to the left of the sled, causing the rotation. I put a level across the bottom joints and adjusted my weight until the bottom joints became level.
Now, when I slide back and forth, it basically stays level. At the far sides, the close edge is always higher. I think this is because the weight of the chain on the long side is actually pulling down the sled shifting the CG.
The good news is that getting everything level solved a lot of my range of motion issues.
5 Likes
This is awesome! Good job on your implementation! I don’t have a Maslow or much time to try things but I did throw one together tonight super quick just to see how the joints worked and how well it stayed centered.
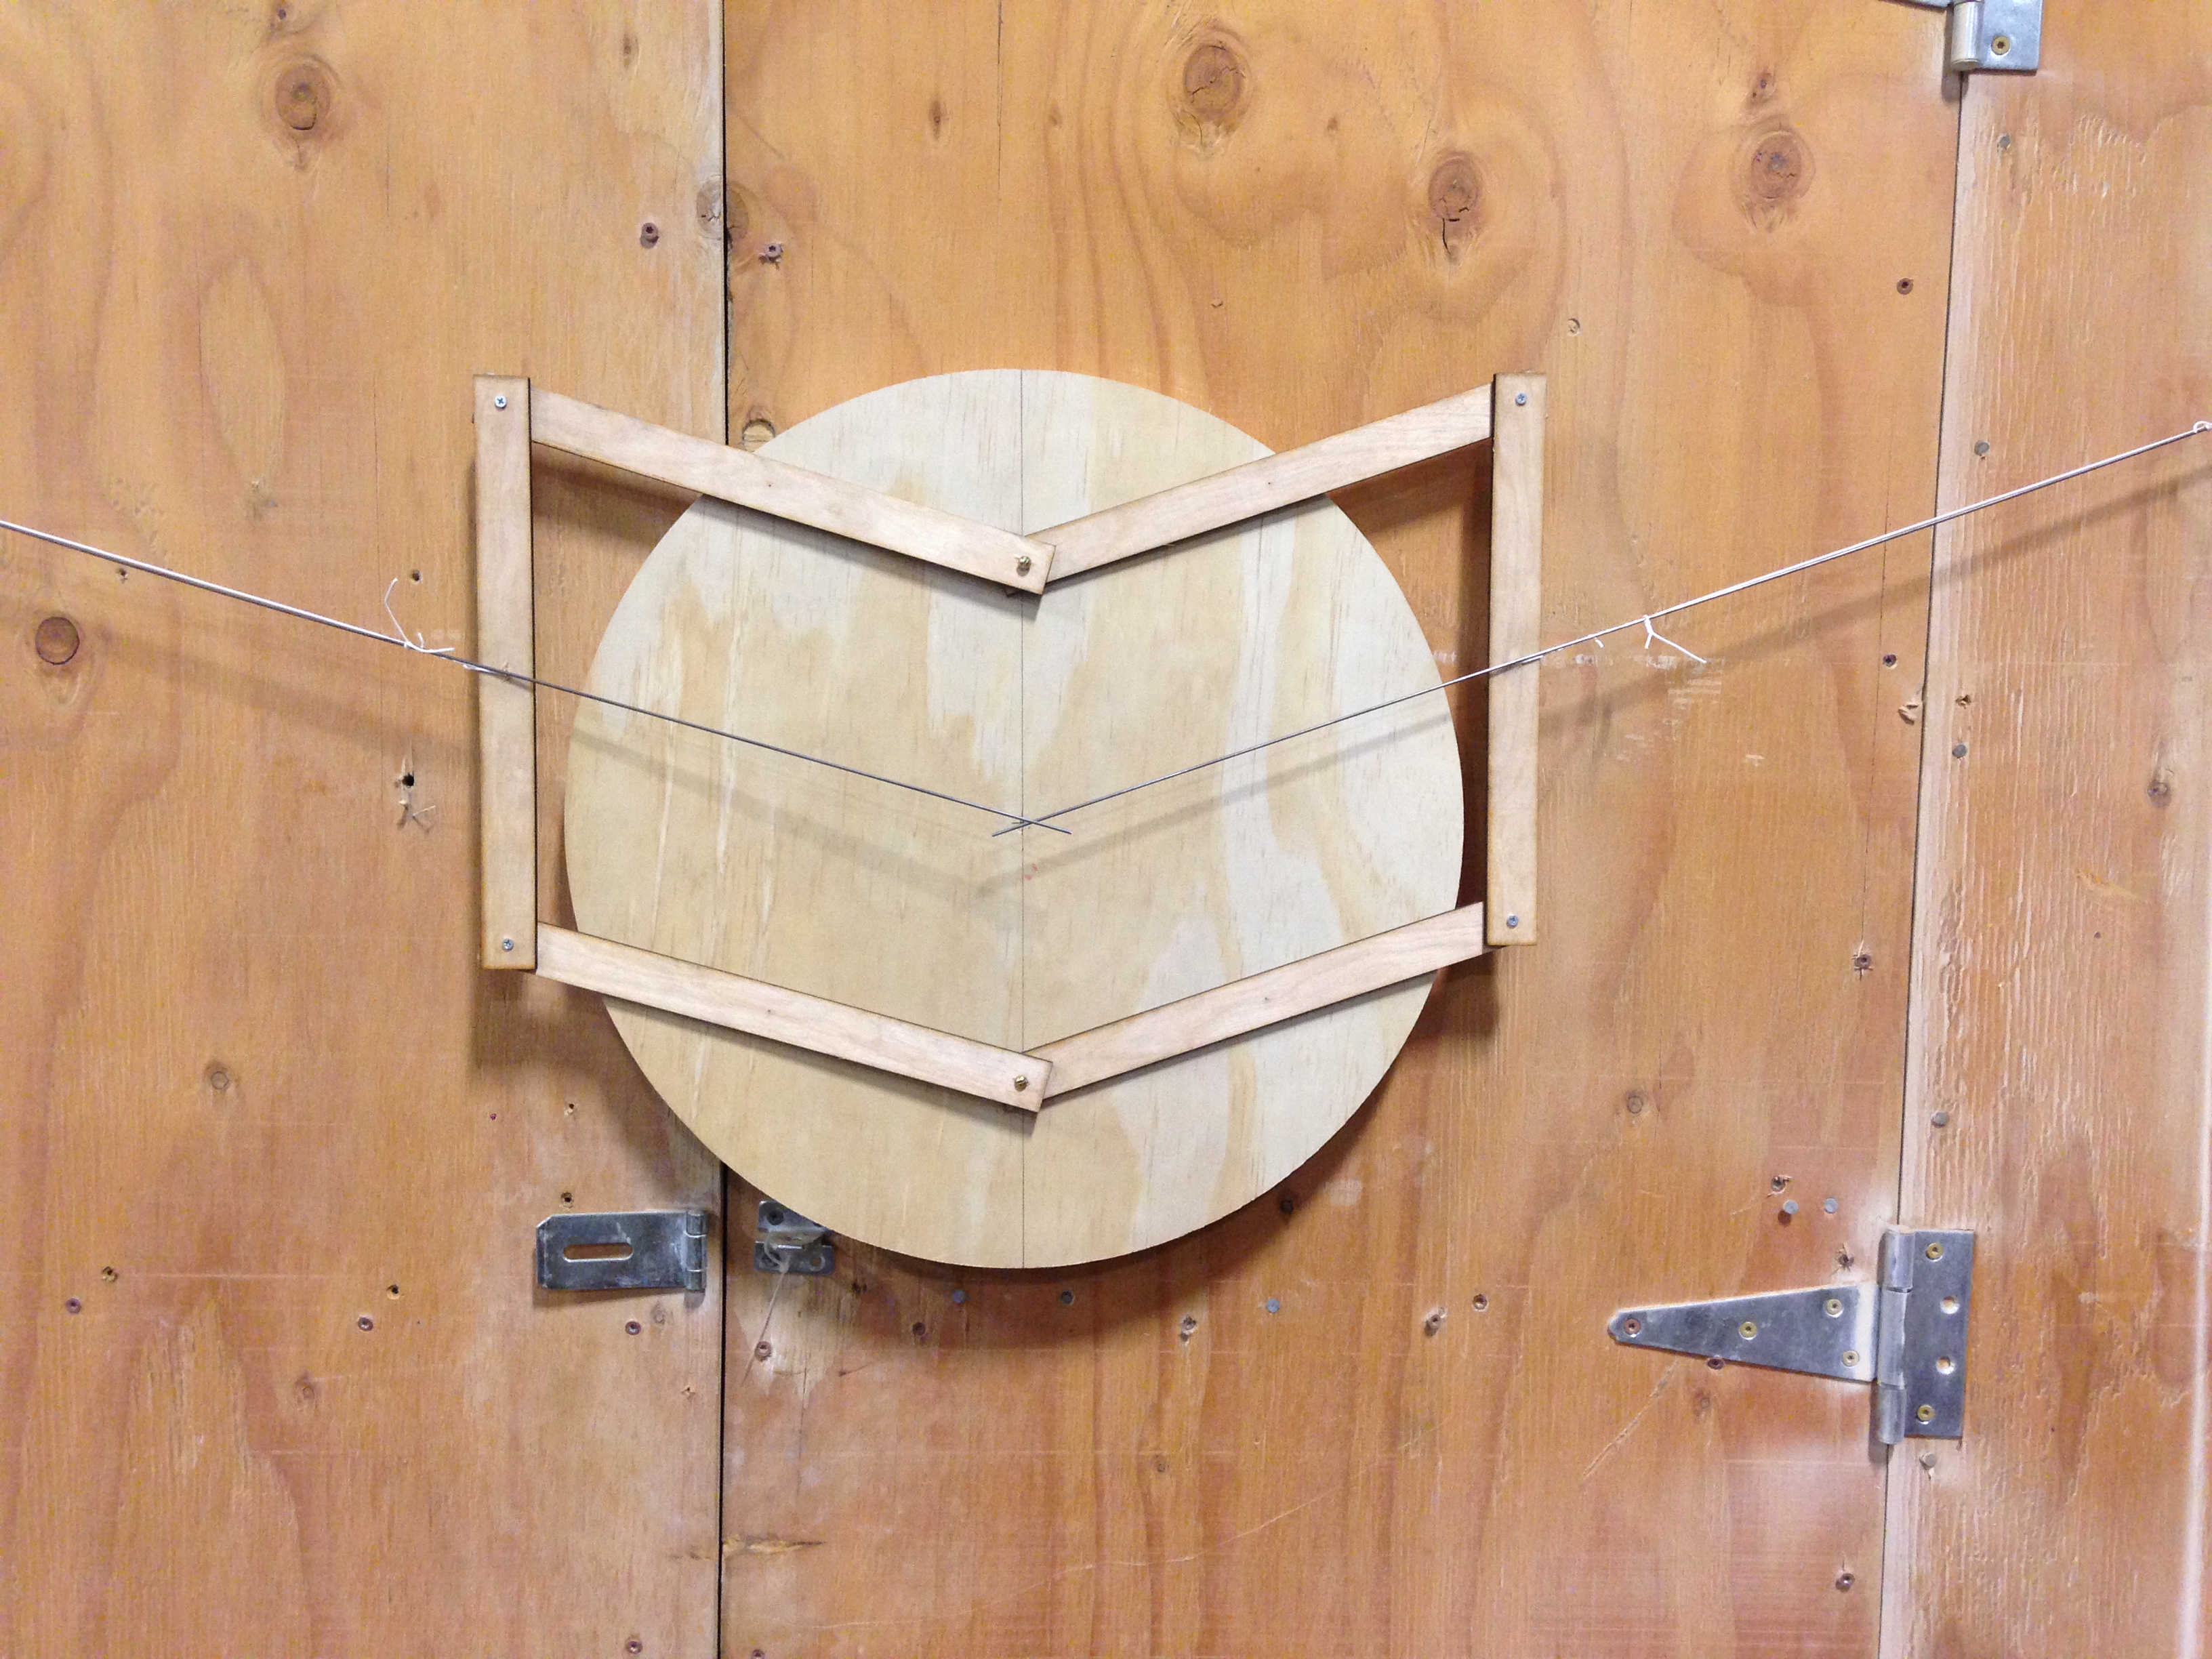
I must say I was pretty impressed. I didn’t have any chains handy so I used some janky thin wire, I wasn’t at home and didn’t have the proper bolts or anything so I used janky screws… Even with all of that it appears to be pretty accurate! In some of these pictures you’ll see that I attached stiff wire to the “chains” so I could visualize exactly where they would cross. The goal was that they cross at the router bit at the center, it appears this could work!

This shows a pretty extreme sled tilt (the pencil line and attachment points should be vertical). I think a sled with a lower CG (my CG is actually centered) would prevent the sled from wandering like this. I manually tilted the sled here.

It’s hard to tell but the pointer wires are crossing directly over my center point! They are actually hiding the nail hole and pencil marks!


This is a super extreme tilt, I don’t know if the sled could ever get itself into this position naturally (by being extremely low and to one side) but I wanted to see how well the chain-lines tracked with the center mark. I didn’t have my pointer wires on for this shot but it was just as accurate as any other angle. The linkages work!! It would appear that at this crazy angle a router would not fit in the center. Of course this can be solved with either curved linkages or by moving the linkage above (or below?) the router.
I also tested the two-attachment-points idea, it seemed to work just great. I didn’t have a router but it seems like it should clear no problem. I only used 6 pieces of wood total for the linkages, I like (and probably prefer) the method you used with stacking to make better joints. But like I said I did it super quick just to test it. I used super crappy 1/4" underlayment plywood. I used 10" between all pivot points. I used a laser cutter to mark the bars so that’s sort of cheating but I marked the sled with a tape measure and pencil (and cut the sled on a table saw!) and my accuracy was just fine…
I think this is a totally viable option. I’m still not quite willing to say it’s “better” than the rail/roller system (I really don’t know which is better at this point) but with some simple refinement I think it could be a very cool, cheap, and accurate solution.
3 Likes
Looks awesome you could mount a pen for testing.
Making the pantograph arms out of wood seems ok for testing, but for a final product laser cut steel is going to be much more durable and accurate and CHEAPER too. six of those pantograph arm segments would probably cost $12 to get laser cut. Labor alone in making it would cost me more than $12!
if you use brass bushing that’s $6 in materials right there. keithg222@gmail.com is my laser guy, he has very reasonable prices for small orders and ships out of Pennsylvania.
1 Like
Great work @krkeegan and @pillageTHENburn!
Its so cool to see this idea come to life and think that it can really work! Awesome. Totally awesome.
Edit:
My original post didn’t express how stoked I am. This is soooooooooooo cool. I can’t tell you how exciting it is to watch the community work together to improve things in way’s I never would have imagined. Thank you everyone! This is awesome! Great idea.
2 Likes
More testing photos. I traced two perpendicular straight lines. I was unable to detect any curve or bend in the lines.


6 Likes
So everything’s 10 inches between shafts? 1" wide 1/2" plywood (think there’s some cabinet (likely chinese or russian, not baltic) birch in the scrap pile, and maybe some 1/4 also, good enough?
Looks like there isn’t any problem with the sled rocking and rolling PID kinematics. Did you alter the chain to bit and/or chain-chain calibration numbers?
I don’t actually have a Maslow yet so I was playing make-believe but my sled is about 18" in diameter and I put all pivot points 10" apart (10" from top to bottom on the sled, then 10" on each linkage arm). This appears to provide enough clearance for a router, but like I said I’m imagining things right now. I think if I were to try again I would shorten the “horizontal” arms of the linkage, they just don’t need to be that long. I’d probably still keep the vertical arms 10" long and the mounting points 10" apart.
The stuff I used was 1/4" but it was only because it was sitting next to the laser and I was tired and in a hurry…
I cut a bunch of ~3/8" (1/2"?) plywood strips last night too for experimentation. If I come up with any new revelations I’ll let you know! I’d like to test the above-router mounting and shortening the arms a bit. I like the simplicity of the two mounting points but you’ll have better router clearance (and be able to use shorter arms) if you mount the parallelograms at a 45˚ angle. It’s just slightly more complicated to cross the arms. But as @krkeegan has proven it’s totally doable!
2 Likes
Can’t wait to see this one ![]()
Not sure if I follow the 45deg angle for the two hole mount, but I’ll watch whatever ![]()
The accuracy of the test runs looked really good. Given this isn’t high-speed (the lever arms aren’t moving much, really, compared to a lot of mechanical linkages), I’m wondering if the wear is really as bad as people thing. Easy enough to build a “wood one” and see how long it lasts.
1 Like
how does it react to pulling on the sled?
Oh, no. I meant that I like the idea of two mounting points but that it might be better to sacrifice that luxury in order to have better router clearance and shorter linkages. I’m sorry I wasn’t clear. I don’t believe there is a simple way to do the 45˚ mount with only two mounting points - I think it requires 4 (not even 3).
The accuracy of the test runs looked really good. Given this isn’t high-speed (the lever arms aren’t moving much, really, compared to a lot of mechanical linkages), I’m wondering if the wear is really as bad as people thing. Easy enough to build a “wood one” and see how long it lasts.
I totally agree! I feel like it would take a really long time to wear out a hole in plywood… But metal linkages would be nice. You can get nice nylon bushings at Ace Hardware for pennies, they would probably serve you well in wood or metal.
I had quite a bit of error in my test system because I didn’t use chains and my sled was probably too light but I did yank around on the sled and it didn’t affect the center point nearly as much as I expected it could. I would need to eliminate the slop in my rigging before I could give you a real answer on that one. Maybe @krkeegan tried it with his better-built test? I was thinking that inconsistent friction between the sled and the surface might mess with accuracy but at this point it’s looking negligible.