Edit: Please watch volume on the videos, the router is pretty dang loud. Sorry.
After a long break due to other circumstances I am finally able to concentrate (briefly) on the dust collection for this Z axis setup. It is probably the single most annoying part of this design for me. I was able to make some significant progress on this over the last month. However, it is still a work in progress.
As I was looking for inspiration on this forum for what others had done I naturally came across the @MeticulousMaynard Z axis. I loved his idea for dust collection, however, for my setup this would not work because my C beam is right where the dust chute is on his design. With this idea I started to ponder how I could make this work for me, originally I tried to just rotate it and see if that would fit, but his base was much larger. With much tinkering (yes I did all of this on tinkercad  ) I merged it with what I had already started months ago for a design with a built in chute. This was the first design.

I liked this design, it incorporated both Meticulous but also made an edit so that I could fit it next to by C Beam. I tried running my maslow in a square just to see how it worked and as you can see here. It did not perform how I was hoping.
This sent me back to the drawing board. I saw that Meticulous had a top piece but I wanted to have something more like the feather style of traditional gantry CNCs. Lets just say that was a horrible experience and I got a lot of superglue all over myself. Sorry not pictures.
My next design I made a shroud for the center area which was also 3d printed but it was triangular shapes that were only .5mm thick. This would allow them to have flex if the router ever does travel that low, but at the same time it gives something for the chips to bounce off of. This worked much better.

After that I realized that I wanted to make the chute a little larger and so I went back to the drawing board.
I found a hose that I would like to use since it has a good amount of flexibility and will work well with my smaller cyclone. I edited the chute to be wider and to also connect directly to this rockler hose.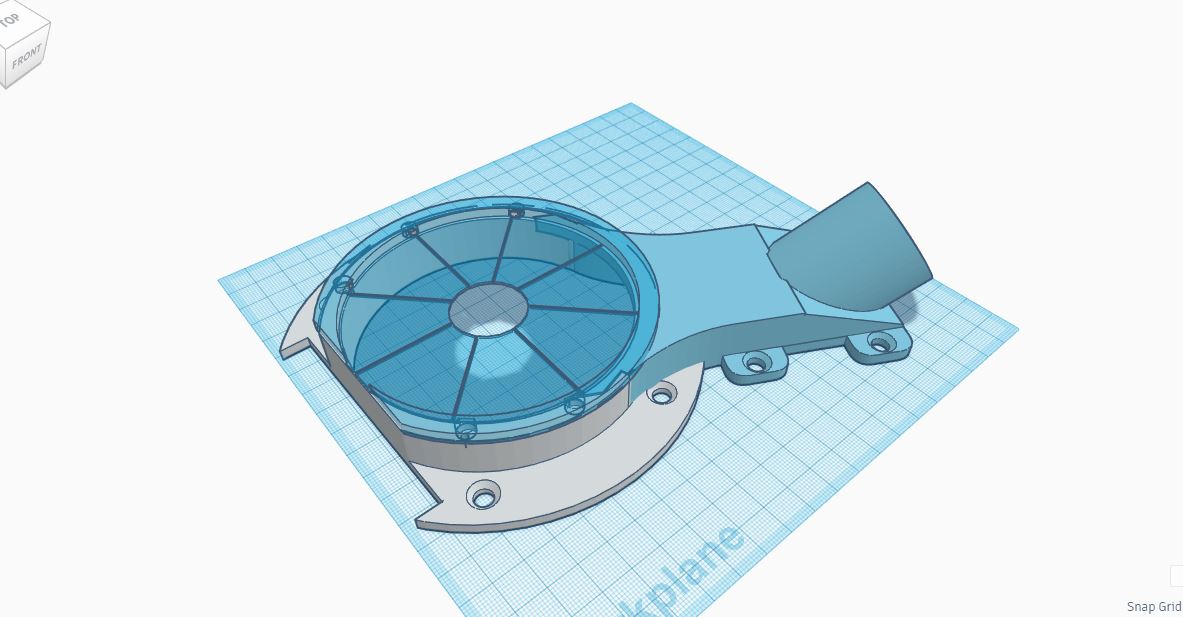

I then went further and added magnets so that the top area could be taken on and off relatively simply just by raising the Z axis and then popping off that top shroud. As you can see here.
I have almost completely installed this design onto my Maslow (sorry a 2 week old baby is slowing me down) but hopefully soon I will have my next revision (I think I am going to adjust the sides to make them thicker so that the magnets do not stick out. Maybe just make it look a little cleaner. I also plan on taking a dremel tool or belt sander to my sled so that I can taper the actual sled up from the router bit out the dust chute. Not sure if it will really improve the collection but I figure it can’t hurt.
But here are all of the STL Files for the 3 parts.
Dust Collection Base.stl (285.6 KB)
Dust Collection Chute.stl (256.6 KB)
Dust Collection Shroud.stl (103.4 KB)
@X7JAY7X I hope this answers some questions. I will try and get final updates sometime this week and maybe even make a video of it in progress. I am currently printing some adapters for the hose to my cyclone. I just purchased a shop vac so I am no longer stealing the wife’s shark vacuum for my dust collection although it does work much better than I had thought haha.