So this took longer than my lunch break, but I was able to diagnose the issues we saw in this thread.
Okay, problem the first:

Which we already pretty much knew was going on. It’s quite an easy fix. Click on “Box Point”, and several white dots will show up. You will want to click on one of the dots at the top of the model. I selected the center point, but you could quite as easily select a different point.

One other quick change I made was to flip the X axis. Not really necessary, but I think it helps. Another easy change:

Another issue I’m seeing is on the stock tab. You have offsets off the top and bottom. This will throw off your toolpaths, and might explain why it was trying to do a pass at the top of the part. You can see the stock above and below the part.
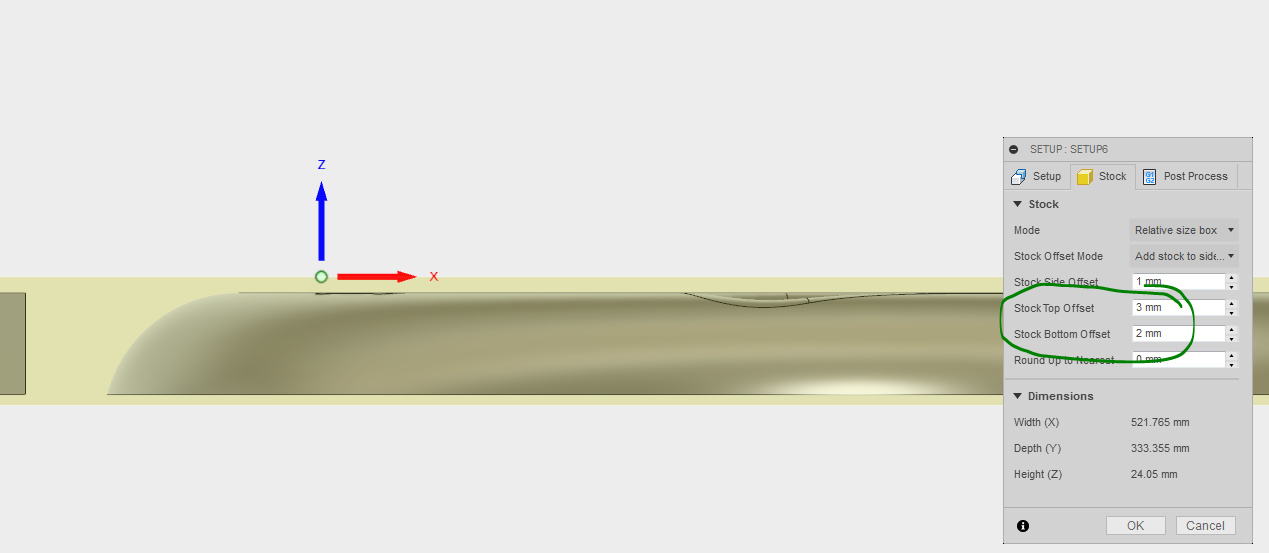
I changed the offsets to 0 off the top and bottom. The side offsets don’t matter as much.

That sums up the changes to the setup. Now, onto the tool paths. I’m going to look at tooling first. I switched the units to millimeters, partly because the model units are metric, and partly because I prefer it. This is another change that isn’t exactly necessary and you can do what you prefer.

The next tab we’re moving to is feeds and speeds. I’m actually not going to touch this right now, because I’m not sure what speeds you’ve found to work for your machine. The only note I’m going to make (and I have said this earlier) is that the listed speeds are too fast for the Maslow hardware. The firmware will automatically reduce speeds to make it work, but I just want to make sure 1) you’re aware of the issue, and 2) you know how to change it if need be. Personally, I’d make it 1000 mm/min (which is the max feedrate).

When you close the tool dialog, you will get this message:

Simply press yes, and it will update your feeds (and other settings) throughout the project.
Onto the issue @Gero noticed earlier. The handle pocket (I’m assuming it’s a handle) is defined by the wrong edge. The same goes for the exterior of the seat. Here, you have the top edge of the fillet selected. I think this is MASSIVELY confusing Fusion.

Also, you selected the top edges. You have it set up right to still make through cuts, so it’s not really a problem. However, I find that you have more control if you select the bottom edge.

There a couple of ways to deselect edges. The way I prefer (so you don’t loose all your selections), is to select the edge you don’t want, then click this X:

Note that in this example, I haven’t selected the handle hole or the holes for the legs. This is because I would make these pocket operations, not profiles. I’ll get into that a little later.

Moving on to the heights tab. There are three things I’ve changed. First, I set the clearance height to 5mm from stock top. Then I set the retract height to the same. I don’t like that Fusion decided to make these two separate values. I always have them set to the same value, and I always get a warning because of it. The last thing I did was set the bottom height to -0.5mm below selected contours. You could leave this set to stock bottom for profile cuts, I just find I have more control if I work from the contours. I set it to -0.5mm so that the bit goes beyond the material just a little. This will give you a clearer cut. If it’s just at 0, then a little skin of the veneer might get left behind.

Most of your settings for the passes tab look good. The only thing I would change is the finishing overlap. This is, again, personal preference, but I find it gives a cleaner edges.

On the linking tab (the last one), I will usually set the entry positions as well. This is probably just because I’m a control freak. I was able to position then away from the tabs so that they don’t interfere with each other.

The other thing I like to do is have lead-in and lead-out. It’s similar to the overlap I discussed earlier. Not necessary, but I feel like it leaves a cleaner edge. These are the settings I use:

So onto pockets. I would prefer to use pockets in these locations, that way there aren’t little scrap pieces that could get stuck. It will take a little longer to cut pockets than to profile, but I find the results are worth it. You could also use a profile cut and tabs to make sure the scrap piece doesn’t go anywhere. The settings will be very similar to the profile cuts. The only major change would be the step-over. You want this to be roughly 60% of your tool diameter.

So this is what I ended up with:

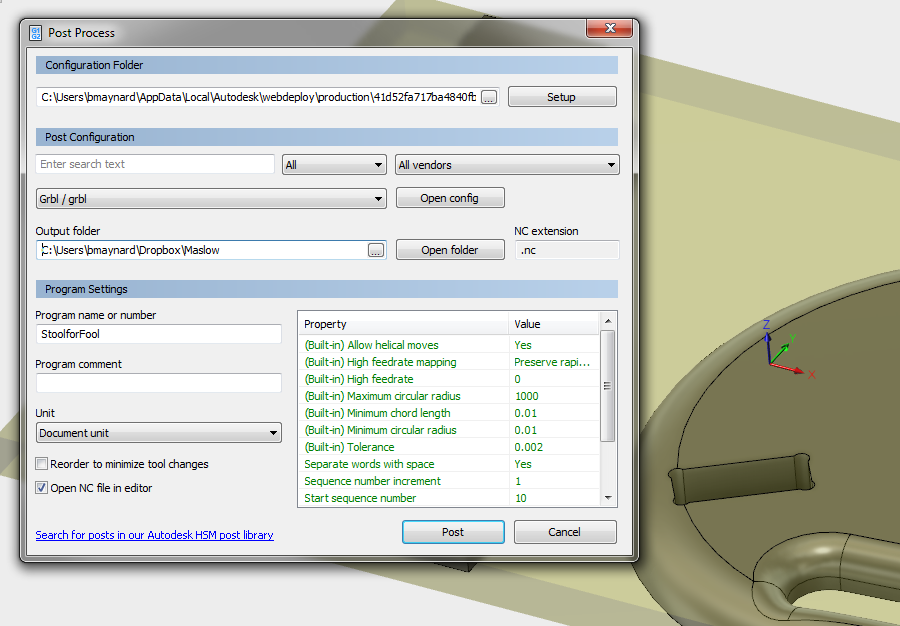
I then right-clicked on “Setup6” and selected post process. These are the settings I used for posting:
A parting note. Instead of setting each setting every time you make an operation, you can right click on any field and you will see two options, “Make Default” and “Make All Default”. I have used these features to set Maslow defaults for the operations I use the most.

Here’s the NC file I made, but I highly recommend you go through this process yourself to get more familiar with the CAM side of Fusion:
StoolforFool.nc (19.9 KB)