USB disconnection issue: solved(?)

In a prior post, I had mentioned that I had communication issues between the PC and Arduino which I attributed to RF noise. @WoodCutter4 asked if I would add a topic to document my effort.

It was about a couple of months ago that I fixed the issue, so I’m not 100% certain I recall all the details but here’s a summary of what I encountered and my solutions.

I had 2 basic issues. While running a part, the CNC would err in 1 of two ways. (sorry I don’t recall the exact message)

1 The cnc would stop moving and “ok” would be displayed in ground control where the g-codes are shown while executing, or

2 The cnc would stop but I would get a pop-up indicating the USB communications had failed.

My electronics were mounted at the top center (back) of the CNC so all cables would reach. I also added a 500w spindle to my system which replaced the Rigid router. The spindle works great, btw.

At first (prior to reading the forums) I assumed it was probably noise from the power because the CNC was in a shop and there were other saws, routers, etc running. Additionally, I had the PC and vacuum plugged into the same 120v outlet. To try to remedy this I bought a 12V power supply (for a PC) and mounted it by the arduino. I then ran clean 12V from the power supply to the shield. This did not not help. Sometimes a part would run and sometimes it would fail. Very frustrating.

I had both my spindle power and signal cable running under the spoil board, so I thought maybe they were getting too close. I separated them but it didn’t help.

After months of struggling, I spent time reading the forum and I found a few mentions of USB issues. I figured I was on the right track but I didn’t realize how sensitive the USB really is.

My final solution (which worked) was:

  • replaced the cheap USB cables with cables that have Ferrite chokes on them.
  • I put a powered USB hub between the Arduino and the PC. I don’t know if this was necessary, but I didn’t want a weak USB on the PC to cause issues.
  • I completely rewired the machine and moved all the power and (power supplies) on the left (back 2x4) side of the machine and all the data on the right side. This, I think is what really helped.
  • I ran a 12V wire pair from the 12V power supply up to the board where the Arduino is located.
  • I moved my Z axis signal cable so it goes over the top of the machine and down to the sled. I use a old fishing rod to hold the cable up as the sled goes +Y. I left the spindle power cable going under the spoil board.

After this rewire, I haven’t had a single USB failure like I had before. It has been over a month and we have done some largish parts (> 30minutes) with no problems. Before this change, the system would fail randomly, but usually within 5-10 minutes or less of starting the part.

The other issue (#1 above) I assumed was caused by the temperate on the Arduino/Shield. I can’t be sure, but the system just stopped without complaining about the usb. I had read about heat issues and thought that might be an issue for me. The symptom seemed occur after running for a longer time. In the morning when it was cool, I didn’t see that error. After it warmed up outside, I would see it. To try a fix, I installed a 12v fan next to the Arduino, using the same 12v I had run to power the Arduino. This was just a car/truck fan purchased locally for about $20. I haven’t seen that issue since, but I don’t know for sure if the fan fixed it or if it was related to wiring as well. I’m in Texas and the inside temp where the Maslow sits can get to 90 or above and it is still working.

Since these upgrades, I have not had any of the aforementioned issues.

If you have any questions, feel free to ask.

Dave

7 Likes

Thank you very much, Dave for this valuable contribution!

Would love to see more of your machine :smiley:

and things you make too!

cheers

Good to know. I have been toying with replacing my rigid router. What materials are you cutting with it?

We mostly cut MDF and plywood. I use a 3mm bit 2mm depth per pass at around 650mm per second. I’ve not had any problem with that over tasking the spindle

Awesome, thanks! Another thing for me to add to the upgrade list :slight_smile:

You can see some of the machine on YouTube on the fauxstonefinish channel. I built the CNC for my nephew, Chad. He doesn’t know anything about electronics but he helped with the manual construction. He has learned how to operate it so that’s a testament to how easy it is to use.

1 Like

I have a complete blender model (somewhere) of my setup if anyone is interested. It would be nice to get my math validated. :smirk:

1 Like

I would not hesitate replacing the rigid router. I never found it very functional. It is very quiet and the z axis is very reliable since the upgrade. Don’t have dust collection worked out yet though. Maslow is a tinkerer’s dream!

that it is… or nightmare, depending on how you look at it :wink:
I just looked at one of your videos. Nice z-axis setup. I take it that your spindle isn’t from anywhere special. Maybe an amazon purchase?

3 Likes

Very cool! I love seeing people use Maslow CNC as a tool for their business.

Interested!

1 Like

[quote=“WoodCutter4, post:11, topic:10480”]
blender model
[/quote]

Interested!
Would share this very basic Blender for a spindle setup in return:

Kind regards, Gero

1 Like

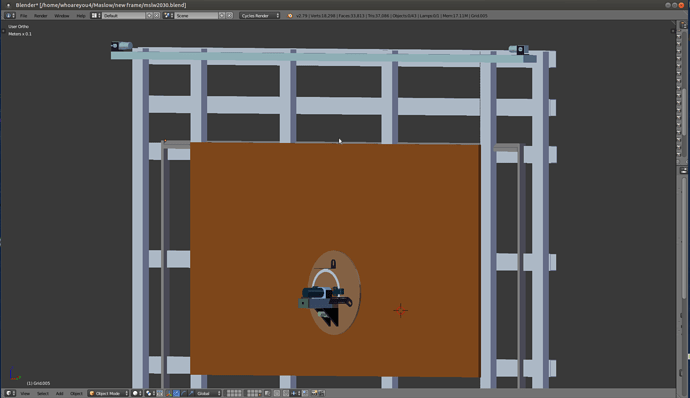
@Gero, @WoodCutter4, @Keith this is an image of what I have. I need to clean it up a bit and then I’ll post the blender file. I have pulled out the colored pieces that I had to make (other than cutting wood). The blue motor stand is a 3d printed part and works with the existing z-motor, the Yellow piece was 3d printed, and turns out to be useless (but it looked cool), the red plate is 1/4" steel (from Home Depot). It has holes that mate the spindle to the aluminum carrier. Getting that drilled/threaded right was the hardest part. I think there’s a better place to post/share this (help me out!) so I’ll post the complete model there, along with info about the purchased parts.

This is an 18" dia sled; 5/8" thickness.

I’m actually going to drop mine down to about 17.75" x 3/4" because I got a sheet of HDPE for about $30 that I think will work well.

I need to work on speeding up the z axis travel because this thing is light and could go much faster than the Rigid. I think Z could travel as fast as that motor can drive it (certainly in +z). Thoughts on that would be appreciated too.
Dave

2 Likes

I used a pulley system to speed mine up by double. You could easily change the pulleys to increase that. Here’s a link to my setup

1 Like

Nice parts, could use some of those :crazy_face:

How fast you can plunge into the material (G1) is limited, however moving out (G0) can be as fast as the setup permits. I’ve used the original Z-motor, tooth-belt with 25 teeth on the z-motor and 20 teeth on the c-beam side. The c-beam has a lead of 2mm, times 4 treads = 8mm. The pulley reduction giving me 2 more mm, i ended up with 10mm per motor rotation. My Z moves max 180mm/min = 3mm/sec (for some reason translating to F188 in g-code)

I could easy see that speeds up to 600mm/min could run well, not for plunging in, but on the way out.

I think it would make sense to move your sled/z-axis stuff from this topic to the link that Keith posted above:

1 Like

I’m not sure what the max is -Z. I guess it’s in the settings and I’ve probably looked at it before. With the way my Z was designed, I just have the straight coupling with existing parts that came in the kit. All I added with the 3d printed hat to hold up the motor, so I don’t get any speed multiplier with mine.

If electrical noise is the issue, installing a snap on ferrite bead around sensitive cables will help to eliminate most of the noise. You see these on power supply cables very often.

1 Like

Yes, just like the OP did :wink:

1 Like

Thanks Dave, just picked this up. I was having the same problem with the loss of USB comms. Our shop is on a small farm and we definitely had a problem with voltage drops - I resolved those by installing a UPS, which reduced the number of drop-outs significantly. However, we still had the occasional drop out, so my next move is to get some braided shielding for the motor cables,as these look like fairly good antennae for any stray electromagnetic interference! We’ve got a fairly old ( and DeWalt Radial Arm Saw and it definitely kicks out the USB when we start it up. It’ll be a little while before I get back to the Maslow, but I’ll post results when I get a chance. If anyone has any other EMI solution suggestions, please let me know!

2 Likes