The old pitch is 3.17mm and the new pitch is 8mm so the z axis is almost 3x faster.
the linkage kit radius is 180.34mm or 7.1 INCHES with the chain holes furthest from the router.
make sure you adjust the clear eccentric wheels so they are not loose and also NOT too tight. depth of cut should not be more than 1/8" in general.
I never got a notice that mine was coming. I don’t know if our work email ate the confirmation mail as spam before it ever had a chance to get to my mailbox. It just magically showed up at my doorstop one day. One day soon, I hope to have another box just sitting on the porch, containing a top bar.
I have a top bar on order as well. I emailed MetalMaslow yesterday about the status and got a quick response. Apparently he’s still waiting on the laser cutting vendor.
I really believe this top bar is a game changer for calibration by eliminating the inaccuracy of the current motor separation distance measurement, so anxiously awaiting its availability as well.
I am also going to pull the trigger on their top bar as well. Ordered my extra long chains last night Just waiting to hear they’re available before I make my order.
I’m having trouble understanding the MM assembly instructions with respect to the top bar: it says on the website that MM recommends making the frame taller by a foot, and the easiest way is to add another 2x4 on top of the top 2x4 of the frame. But that would just add 4 inches on top, i.e. a third of a foot. What am I missing?
Yes, I got the sled kit named “Laser cut sled, Z axis and Linkage upgrade kit.” The top bar is supposed to work in both 10’ and 12’ configurations. At least the holes are predrilled for those distances. I’m not planning on using the extra width right now. My biggest concern was being able to easily remove the parts that don’t like to get wet (motors, sled, electronics) since I have to use my toys outdoors.
The top bar modifications are saying that you should be build your frame to be taller. They are just recommending that instead of putting a 10’ wood beam across the top to use a 12’ one. You need to make the vertical portion taller than the default frame’s height.
Yes, same thing I got, and my corrected parts just arrived, and I’m in the middle of a test cut now. I’m loving my z-axis now! This thing is incredible. I’m really glad I opted to purchase it. Because in my opinion the only real weak link in the Maslow is the router base. Now that I have that solved, I feel like I’m going to make some real masterpieces with this thing
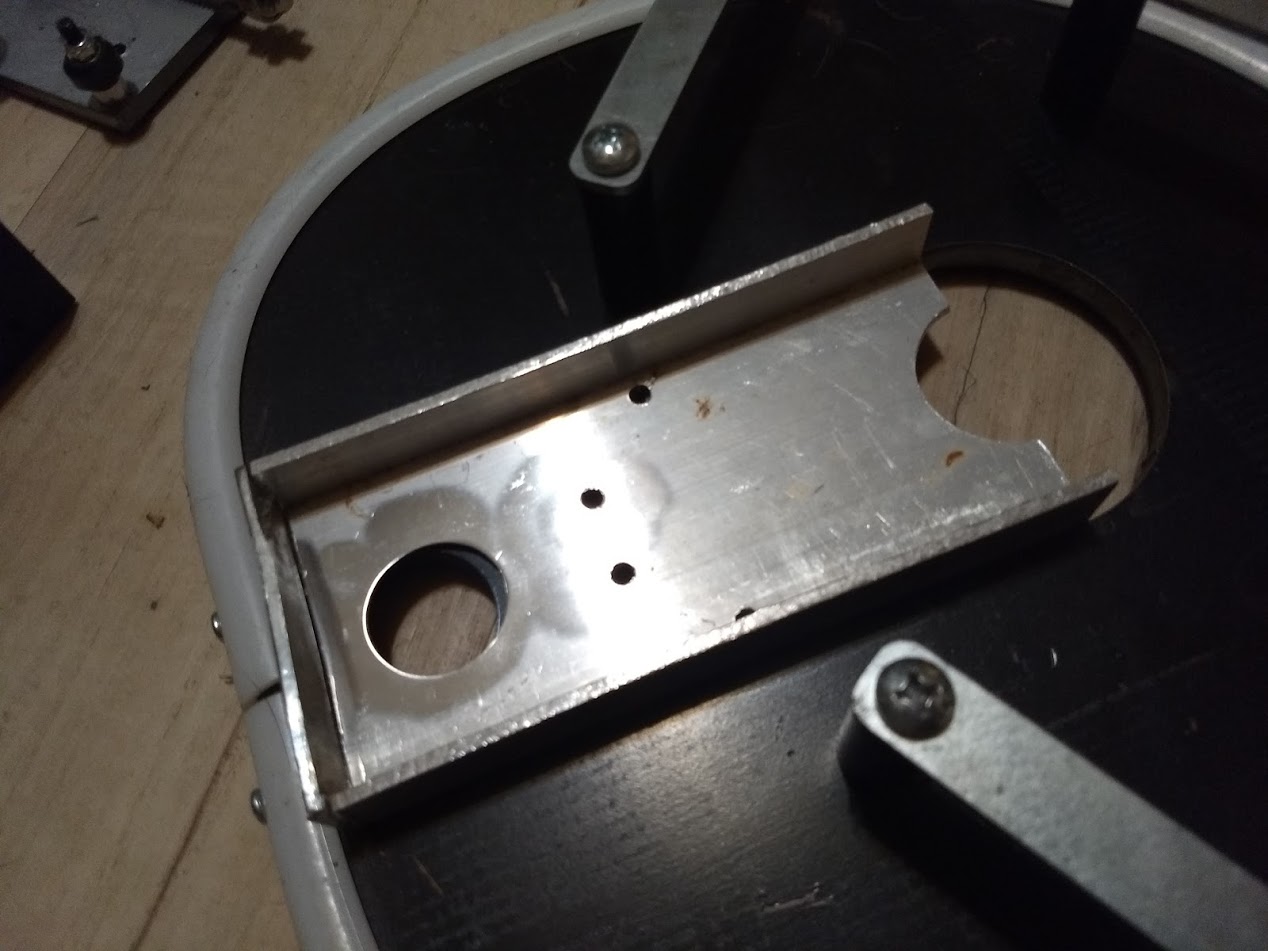
Hi all, looking for some help on assembly. First, the spacers on one of my linkage arms are on the opposite side of all the assembly pictures. Should I swap them to the other side or will it matter?
Next, I have the new z-axis and am not sure how to attach the clamp. I can’t screw from inside the z-axis to the clamp because the holes in the clamp aren’t threaded. I can attach them from the clamp to the z-axis but the holes on the clamp aren’t counter sunk so they don’t sit flush. Is this how it’s supposed to be attached? Does it matter which of the 3 sets of holes I use?
Ok, in the first photo. Yes, you have to flip it over. Mine were like that. I had to remove the 2 end pieces, push that little brass collar through to the other side, and put them back on flipped. Make sure the tiny cotter pin holes for connecting the chain are to the outside when it’s right side up.
2nd photo. That’s weird. Mine were all countersunk, and there were a few sets of holes for adjusting. I just put it in the lowest position I could, that all 4 screws would still go in. And my router clamp was threaded. You must be using a different router? Like the Makita one they recommend? That clamp looks totally different than mine.
3rd photo. That is the dust chute. You hook it up just like you have it in the photo, but where the solid side is facing upwards. The vaccum hooks into the hole where the solid edge is. The c beam bolts go through the sled, through the chute, and into the bottom of the c beam to hold it all in place. Don’t forget to use blue thread locker.
Sorry for not responding to this thead for a while. I was out of commission due to a back injury. If you are using a 3.5" or bigger diameter router we counter sink the back side of the gantry plate. If you are using a smaller Makita router then the holes are instead threaded and screwed in from the front. if we sent you the wrong plate by accident send us an email and we will get it fixed.
@Metalmaslow I bought one of your kits, and it’s my first maslow.
I have assembled the sled. I have made the frame.
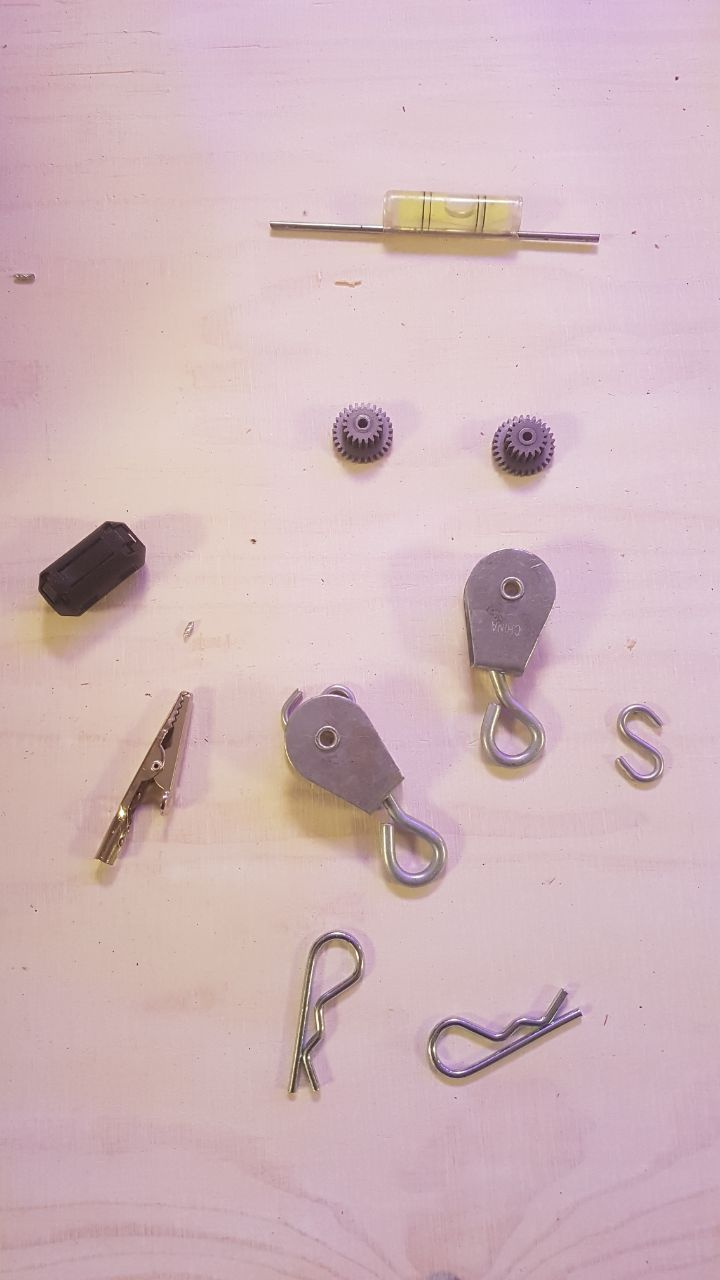
Now I am really unsure where to put the pulleys and stuff. Can you make some more pictures of the frame using all the included stuff in the kit? Where do the big and small pulleys go. How is that connected to the rope, etc. It’s not in the instructions of the default frame and also not on your website…
** EDIT ** I think I figured some stuff out by myself, but I still appreciate pictures.
the gears are extra ones in case your gear motor gets stripped. SAVE them for possible latter use. black ferret choke goes on usb cable.
aligator clip can be used with ruler and extra black/red/yellow/red wire to make a zeroing device, small pullies are for white rope and large pully is for metal chain. I will try to get some photos, but there are a few threads on the forum about counterweights that show photos.
This looks to be better than the current Black Friday sale. I’d be interested if you do a full walk thru setup via youtube or something. The plus with your kit is that the sled is metal and it includes the router.
 Just waiting to hear they’re available before I make my order.