yes, though it could be a metalmaslow cnc machine or an eastbay cnc machine or some contraption you built out of your own parts that runs a maslow controller as well. I think you get it. I generate gcode with estlcam.
@bikeshelters.org As @Orob has said, you are getting there! I will provide the following link:
The OP there was also very confused with all the software that was out there and what it did. It has a lot of good info for what CAM (Machining - assigning the toolpaths and how they will be cut to create the GCode) can be used, and what CAD (drawing and creating the vector drawings needed for CAM) programs are out there. From here, there are many options out there that you as the individual can use based on how simple and cost effective you want to be. You are not relegated to just Easel. It is a good place to start, but if you are using the free version, you will be very limited, and the Pro version can be costly (the last time I checked).
I have used EstlCAM (to create GCode) and InkScape (creating vector graphics), but I am currently trying out Carbide Create (which is very similar to Easel, but has a free version with much more capability than Easel does in their “free” version. In this aspect, it is really a personal decision and figure out what works best for you (and your wallet)!!
Thanks for asking all the questions, it took me a bit to figure it all out and what worked best for me and my Maslow, and I am still always looking to improve and find more efficient ways to do things. I got there, and you will too!!
= TRUTH!
The Makermade M2 CNC kit requires a baseline knowledge of many pieces of software and technology that (to be honest) are not articulated / spelled out specifically during the original purchase process. Even though I am crash course learning everything now and would have purchased the M2 Kit no matter what, I am somewhat discouraged that I was not aware that I needed to learn how to use Makerverse and Easel (or equivalent GCODE creating program). I could saved months of frustration had I known what software(s) I would be using so I could learn those softwares…the setup assembly guide that comes with M2 Kit was outdated and contained Makerverse 1.0.6 which does not look like 1.1.3 during setup and calibration so all of the Youtube videos, Forum instructions, and pictures + instructions in the thumbdrive PDF assembly guide do not match up which causes unbelievable frustration and confusion. I do not blame anyone for this but I can confidently say THIS is easily the biggest problem in setting this M2 machine up
Currently, I have learned how to upload my vector drawn logo into Easel and create a 3D appearance of what it and the tool path will look like
so that is progress! Now currently, I am trying to figure out how to upload / import this SVG GCODE file created by Easel into Makerverse and because there are no instructions or videos anywhere so I am struggling once again…how do I get this file into Makerverse so I can start the M2 machine (with router turned OFF) and see if the test run goes properly?
To be perfectly honest, I would have gladly paid another $1000 in the beginning to have all these confusing and complicated technology / software issues just dealt with and up and running. Building the M2 Kit and frame is EASY compared to getting the software and technology up and running…this is the achilles heel of this M2 kit, there are simply too many options of software and too many variations of people’s setups out there and a profound lack of written / video documentation on how to setup and calibrate + do first test cut…again, in hindsight, I would easily and gladly paid $1000 to skip all of these last 4 months of frustration and confusion and seeing my hard work destroy itself because the software wasn’t set up properly. If Makermade offered a $1000 option somehow to skip all this extremely difficult and hair pulling setup and calibration at least I for one would have purchased it…perhaps that $1000 option for software setup and calibration could be done through 3rd party vendor contractors such as people like some of you? either way, the software varieties and setup difficulties are the worst part of this whole adventure and may anyone who reads this strongly consider learning the Makerverse and Easel or similar software BEFORE they assemble their M2 Kit and better yet, perhaps prospective purchasers might consider hiring someone like some of you to be setup consultants to handle the software setup and calibration?
Anyhow, as I mentioned, I am now trying to get Makerverse to upload / import my Easel GCODE SVG file so i can do test run with router turned OFF and thus far I am not having success…are there videos that show this step of the process that I can refer to?
thank you sincerely to everyone here, greatly appreciated! I look forward to becoming a CONTRIBUTOR to new users once I reach baseline experience and competence with the M2
this will likely be VERY HELPFUL to other new users so I am posting it here —> once you successfully import / upload your vector drawing file into Easel software, the next critical step is to turn that drawing file into GCODE that makerverse will understand and be able to do something with… here is what I learned trial and error by watching a ton of videos (most of which did not show or explain this critical step)
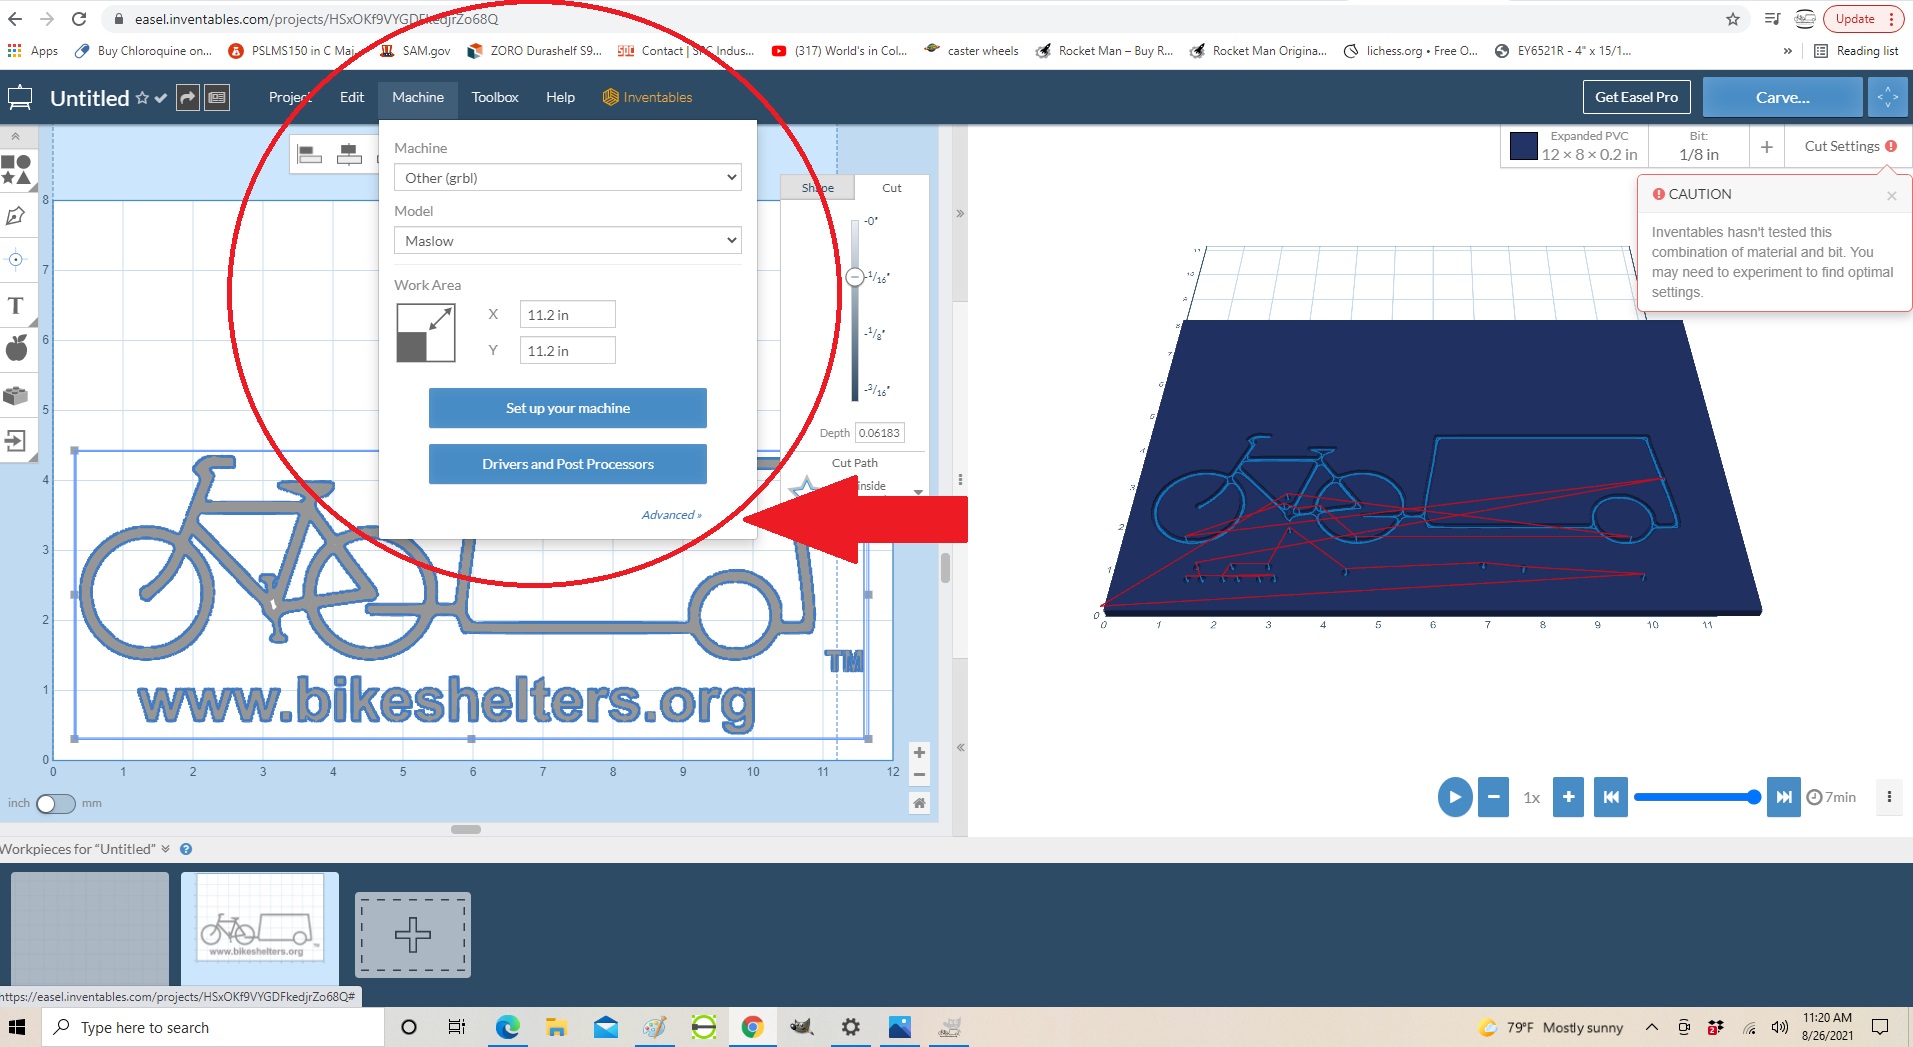
in Easel software after you have successfully imported / uploaded your drawing file and clicked “SIMULATE” in lower right hand corner to show tool cutting path, the next CRITICAL step is to tell Easel to convert this drawing file into GCODE…now everyone says to do this but none of the forums I could find SHOW how this is actually done in Easel so here is the process which I think will help many others and save some hair pulling confusion and frustration —> click on the MACHINE menu tab at the top of Easel software and fill in the items as shown above THEN click “Advanced >>” in the lower right hand of this pop-up menu

This NEW pop-up menu appears with the option to “Export G-Code” as shown here and THIS is the step that nobody else has shown or detailed that I could find…clicking this creates a “.NC” file that Makerverse knows what to do with that can be imported and shown on the Makerverse screen…
These may be steps that are obvious to many of you but I could not find videos or pictorial documentation of this process…this video about Makerverse 1.0.3 did help but there were many areas that do not match up with what Makerverse 1.1.3 looks like Makerverse Intro Video - YouTube
Now, I am able to upload the GCODE file of my logo but I am stuck at the next step which is “why can’t I hit the Makerverse PLAY button” and have the M2 Machine start moving through test pattern? every step forward encounters more obstacles but I will keep posting progress…please if anyone has any comments feel free to reply below
I feel your frustration. I went through the same as I was not aware of the work-flow through all the various software packages. I go mine back in 2019 (I think, maybe 2019), and I am just getting to the point where I feel comfortable providing info to others here, and understand it is mostly what I have learned from reading a lot on this forum, as well as my own trial and error.
Unfortunately, I do not have or use Makerverse, so I can’t say how to get it to open your GCode and get your testing done. I just did a search on the YouTubes, and found this video: Makerverse 1.1.4 Beta Review - YouTube
I know you are using 1.1.3, and that is a review for 1.1.4, but from it I was able to derive that you 1st need to create a workspace (if you haven’t already), and then it seems as if you click on “Upload Program” at the top of that workspace and then go from there.?. Again, I don’t use it, so I am just guessing from what I saw in that video. I am going to tag @MakerMadeCNC here to see if they can provide you any help with the use of their software.
Stay strong…you’ll get there!
yes sir! And thank you for your generous kind responses!
I am committed to “getting there” but wow WOW the obstacles of understanding these software “work flows” is maddeningly frustrating and confusing. Again, I do not blame anyone for how absolutely difficult the process is for getting these M2 CNC machines up and running but it is my sincere hope that the step-by-step documentation greatly improves…way too many things are “assumed” in the existing documentation and worse yet, most if not all the existing step-by-step documentation is for outdated versions of software or for older machines like the original Maslow which use TOTALLY DIFFERENT software (like GroundControl which is not compatible with the new M2 CNC machine) so that creates unbelievable confusion and chaos…
If @Makermade is reading this particular forum, I strongly urge them to create a website page for the M2 CNC machine that is DEDICATED to software download links and written and video instructions SPECIFIC to the M2…I have had to learn the “hard way” that nearly all the videos and forum advice out there is for older Maslow CNC machines which use different software and have radically different setup and calibration processes…now I understand that creating step-by-step written and video documentation about set-up and calibration is extremely time consuming but this is where EVERYONE grows angry / discouraged / frustrated / gives up so it makes sense from a sales & marketing perspective that more M2 Kits will be sold if the reputation of the M2 Kit being “easy” to be assembled and get up and running with step-by-step documentation existed
I watched the Makerverse beta 1.1.4 video and it does not answer my question as to how to properly import GCODE file and be able to hit “PLAY” in Makerverse to get the M2 CNC sled to start moving (with router turned OFF since I have never operated this machine before)
now I am just getting frustrated and angry…I am trying to doublecheck Z axis calibration before proceeding to test run using the MakerMade M2 Z-Axis Calibration - YouTube video and right off the bat the Z axis went berserk and I kept hitting RESET RESET RESET on Makerverse but it did nothing and the Z axis unscrewed itself and I had to unplug the power supply to the M2 control board…that is ridiculous! Previously I had this running and behaving itself and how I go back to doublecheck calibration and it’s running wild again…not happy! I patiently tried to re-connect the Z axis belt to both sprockets and get the router re-installed but all this is not cool at all…I properly closed out of Makerverse according to Makermade Joel’s instructions and then “X” 'd out of Makerverse after that after turning off power to control board now I keep getting “soft limit error messages” and my Z axis won’t move at all…this is beyond ridiculous that it is one error after another one obstacle after another (rant rant rant I know but I am hoping others will learn from my experience, victories, defeats, trials, and tribulations in attempting M2 CNC setup using Makerverse 1.1.3)
why didn’t the RESET button work? Why didn’t the CLOSE button work? Why did I end up having to unplug the M2 control board power cord? I am starting to understand why some people install a big red STOP kill switch on their M2 CNC machines
deep breath…what do I need to do to get the Z axis moving so I can calibrate it according to the video? What on earth is causing all these errors and obstacles? Nobody else seems to have these insane obstacles one after another where sometimes the machine runs wild and destroys itself or nothing functions or responds to commands through Makerverse as advertised…very unhappy right now. what is the problem?
If I “CLOSE” out of calibration pop-up menu and then hit RESET and UNLOCK at top of Makerverse page I can then continue sometimes but not everytime…I just want to calibrate this machine and get to test run…why is that so difficult to get that milestone? The calibration process is insanely difficult and filled with errors and obstacles. I look forward to overcoming all of this!! Oh my word this is beyond frustrating!
As mentioned earlier, if Makermade or anyone offered a $1000 we will do your calibration then I would have paid it…this process is insanely confusing and hard to accomplish.
EDIT UPDATE: 2 Tankards uploaded a Youtube video of the newest 2021 M2 with blue steel Z axis router tower and he shows the newest Makermade M2 step-by-step instructions so this has been done for all those folks who buy the newest 2021 M2 CNC kit…I bought my M2 in early 2021 so actually it is a 2020 model with aluminum Z axis router tower which came with older version of instructions and Makerverse software. Good work Makermade! Bummer for me who bought one of the last 2020 models of M2 though because man I have had so many obstacles and problems especially with the older version Makerverse instructions that don’t match up with newest 1.1.3 version of Makerverse…anyhow, that’s that
I was able to overcome all the soft limit error messages in the Z axis calibration process and per 2 Tankards excellent Youtube video I went to Harbor Freight and bought a digital micrometer that reads in MM and inches and followed 2 Tankards excellent video and accomplished Z axis calibration…for those who have an M2 CNC from 2020 or 2021 do yourself a favor and watch ALL of 2 Tankards Youtube videos of measuring and calibration of the M2 and save yourself a lot of time and hassle:

just subscribe to this guy’s channel, he is on most of the weekly Makermade group zoom chats that are uploaded to Youtube as well and clearly he knows what he is talking about
…I next doublechecked chain calibration going through the steps and finished that…so now next up I will try to do first test run with router turned OFF
UPDATE: I was able to successfully create a GCODE version of the logo in Easel with randomly chosen cut depth of .25" and randomly chosen “cut within the lines” setting and I then followed the steps up above and exported the GCODE / “Untitled.NC” file to my Windows 10 computer and then was able to UPLOAD / IMPORT that .NC file into Makerverse successfully and hit the PLAY button…I have router OFF and I removed the router bit so sled is not dragging around the work surface…so now for first time ever, the M2 CNC Machine is going through it’s first “test run”
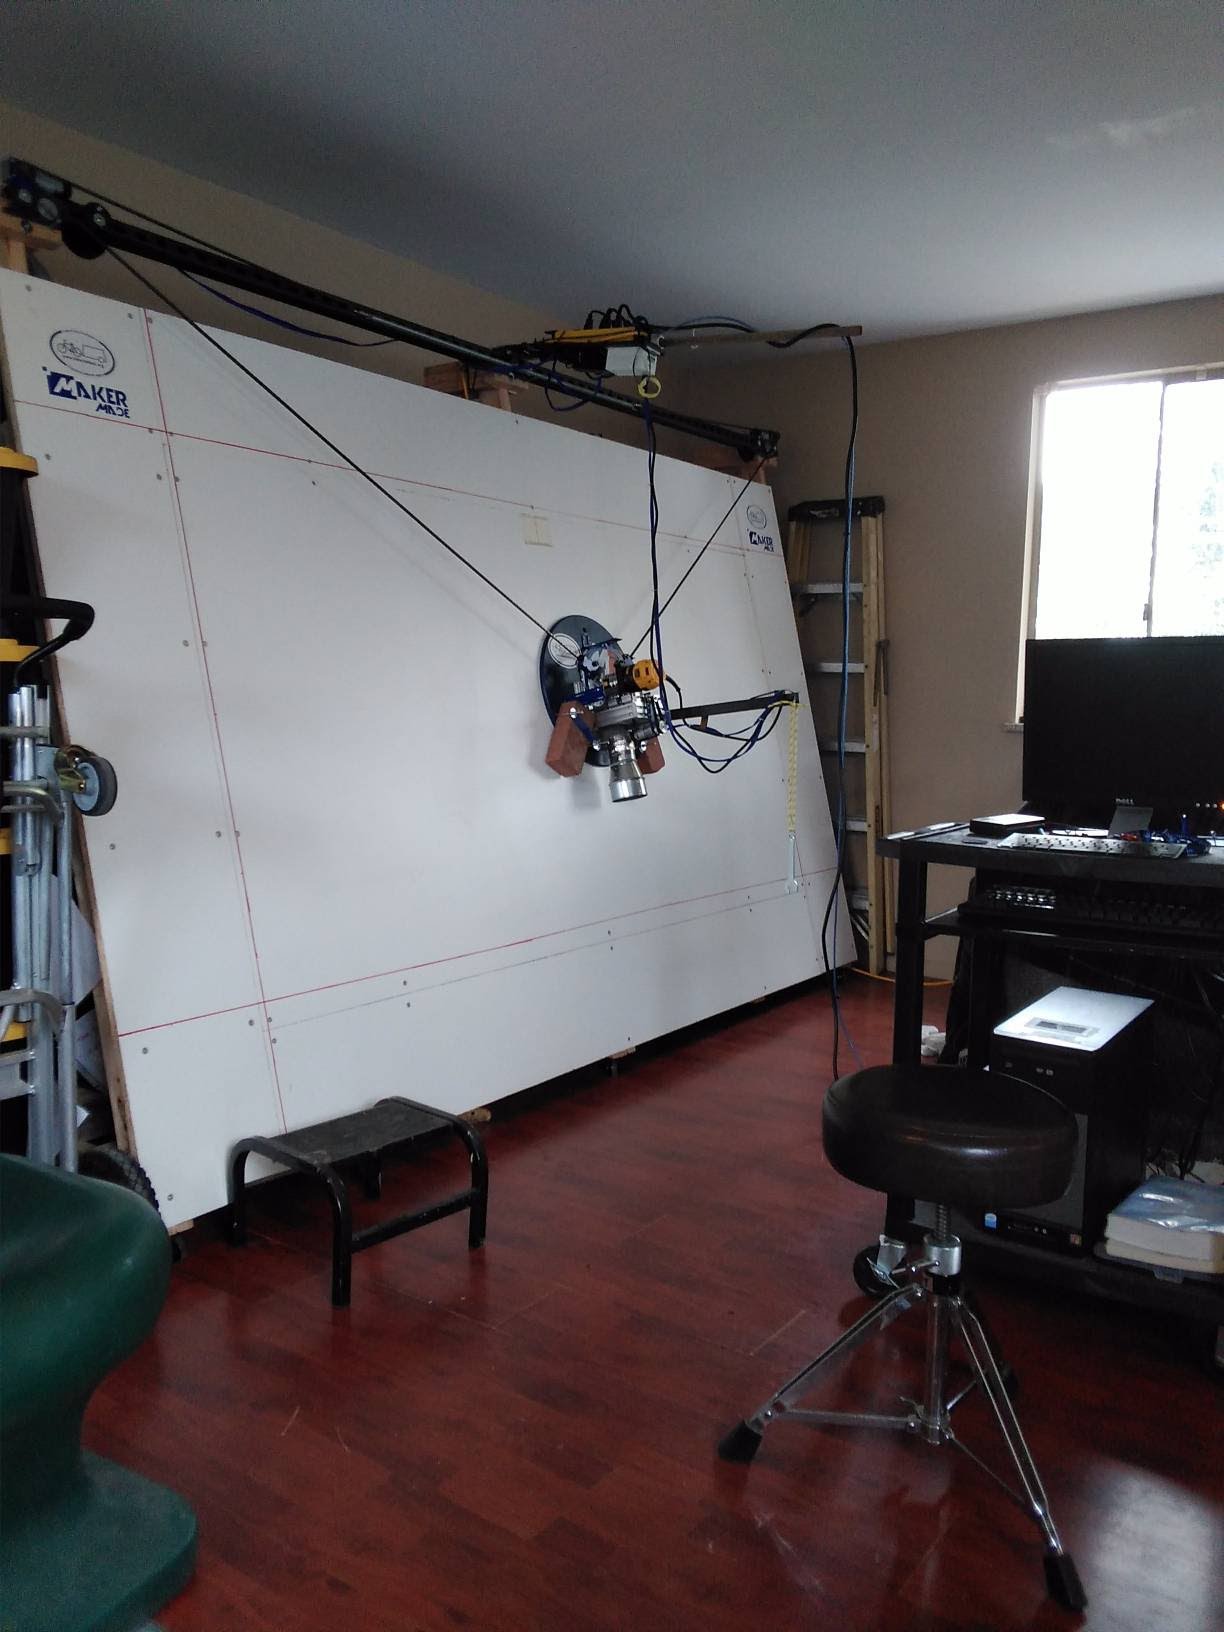
I do not have my workshop 4" dust collection system connected to the M2 sled obviously and I am not totally convinced my overhead wiring to M2 sled is going to be permanent but I will keep testing and see how it all functions…but below is picture and to be honest I feel an ENORMOUS sense of exhaustion to have reached this “first test run” milestone…so many obstacles I have had to endure and overcome but I made it to this milestone and I feel physically exhausted,I purchased this M2 kit back and the materials to build frame in April many months ago using my US Government $1400 stimulus check (thank you Uncle Sam)…frame has 3/4" MDF work surface and I used same material for a 12" surrounding skirt so I can run the sled to the edges of work surface and cut reliably without sled tipping over / binding up…this is NOT YET tested but I hope it works well and will report how it goes
I bumped the blue braided wiring harness that connects to Z Axis motor so that went berserk and unscrewed itself (these are not very reliable or solid motor cable connections @Makermade and if you offered some sort of higher grade screw on / screw off cable connection option I would gladly pay extra for that!) so after this first test dry run I will have to re-do Z-Axis calibration AGAIN after re-setting the belt and going through all of that…sigh, I have made great progress but these infuriating small obstacles continue. Other brand new users should be VERY AWARE to make sure their blue braided wiring harness connections are solidly connected to each X,Y,Z axis motor or you can expect gigantic problems…learn from my mistakes if you can 
I will re-build / re-install the Z-axis belt and sprockets and re-calibrate the Z-axis after this first test run and update progress then…I hope to do actual first test cut into 4mm coroplast (which is material I plan to be cutting / milling most often) before the end of this day is over and post a picture of how it comes out
UPDATE:
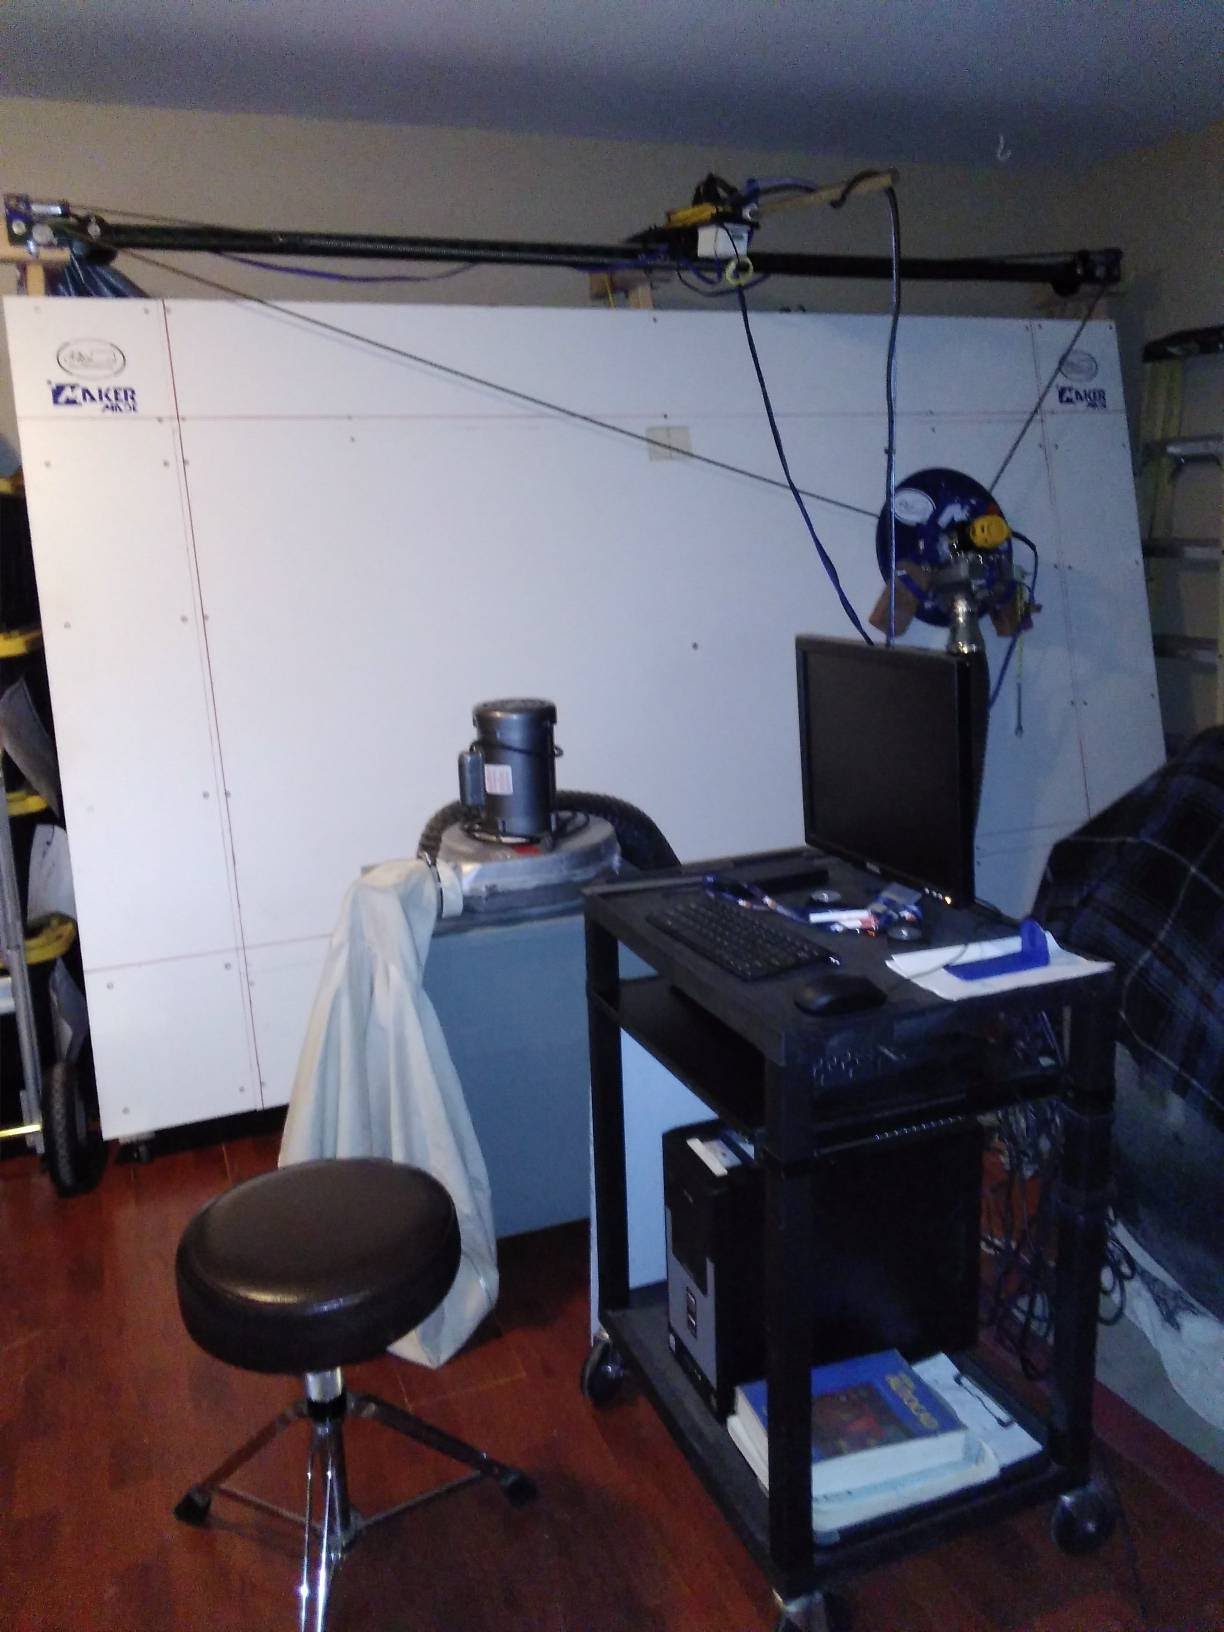
I have successfully calibrated, doublechecked, and re-calibrated X,Y,Z axis and am on my second test run with dust collection hoses connected (with router turned OFF / no router bit) and so far so good. and each time I encountered that sled was off less and less and returned to HOME at same point after a few calibrations…i did have to modify my cable management system at the sled because cables bound up at lower right hand corner (I may end up just relocating the power supply and M2 control board to BELOW the frame assembly so all the cords drag on ground but stay out of the way as sled moves around…I will see how testing goes and decide afterwards)
I opened up Easel and imported my logo and this time around I made it much larger 36" wide by 24" tall, set the cutting depth (guesstimated) and then exported the .NC / GCODE file to my Windows 10 computer…I successfully opened Makerverse but the machine didn’t “see” COM4 port so I had to restart my whole Windows 10 computer because this M2 CNC simply will not connect through any other COM port except 4 (why?? I don’t know?) but after that confusing delay / obstacle the Windows 10 computer restarted, I opened up Makerverse 1.1.3 and successfully imported the drawing file I just did in Easel and hit “PLAY” on Makerverse and everything seems to be running fine
1 Like
Congrats!! I’m glad you got it working! Happy Day! Now time to start getting it dirty!!
thank you sincerely, I am going to put some sheets of coroplast on the frame work surface here shortly and install the router bit and hit “PLAY” and report back
this has been a very very very difficult project to get up and running but I woke up today feeling as though I have reached a plateau milestone. I have had to calibrate so many times now that I am getting quick at it. I don’t think I measured and calibrated the chains with sprocket teeth in alignment because I am still “off” about a centimeter over the 4’ x 8’ work surface and the sled returns to HOME center but sometimes is “off” center about 1/2 to a full centimeter…so I think the problem was not making sure the X & Y motor sprockets were aligned with each other when I measured and calibrated chains…I will dig into that maybe later but it is time to get that first test cut achieved and see how it comes out
I attached a piece of coroplast to CNC frame work surface with screws and washers tightened flat and turned on machine but Makerverse cannot find COM4 port arrgggg! So I am fully restarting Windows 10 computer (again)…why do we have these COM port connection issues? Makerverse refuses to run on any other COM port except 4…why? I don’t know…ay yay yay…
I am already noticing that this small piece of coroplast causes the M2 sled to tilt and the router bit not to touch the coroplast…so I am attached another piece of coroplast of same thickness below the piece I want to test cut so the sled is level with router bit in contact…attached the second piece with packaging tape
Now I am trying to get Makerverse to connect to COM4 port of this Windows 10 computer

I CLOSED and “X”'d out of Makerverse, shut down, powered OFF, and restarted Windows 10 computer and was able to get Makerverse to connect successfully to COM4 port
now I am doublechecking Z axis calibration as I have noticed the router bit was 5mm or so above work surface and the Z axis assembly only had 8mm of upwards travel left…so I loosened up the router in the clamps and am trying to center everything so there is upward travel and downward travel for the machine to function properly
SUCCESS! First test cut with router ON doing a small solid circle and the word TEST1 came out fine. My dust collection system worked good and makerverse and M2 CNC machine functioned properly. I have learned a LOT through this project. I am now planning to do test #2 of my logo much larger on this same piece of coroplast.
short video of first test cut watch[1] (214.4 KB)

when I picked up the sled I pulled the Z axis away from where it was (why does this screw drive move?) so I am unsure if I now need to recalibrate Z axis for next test cut #2…I will doublecheck Z Axis calibration anyways to be sure…so let this be a lesson for everyone who is new to these machines NOT to pick up the sled from the Z axis tower assembly as it WILL MOVE and potentially ruin your Z axis calibration…live and learn!
1 Like
if returning to a known position is off, check if you are having the chains skip
on you. The Maslow has problems with accuracy (matching what you want on a tape
measure), but if very good in terms of preceision (extremely repeatable). If you
move and move back and aren’t where you started within the limits of your
vision, you have probably had something mechanical jump on you.
David Lang
it’s a windows thing. If the com port isn’t fully closed on the windows side
when the device resets and reconnects, it thinks com4 is in use and so assigns
it a new port.
David Lang
thank you Mr. Lang, yes the COM port issue is still a problem…it appears the problem arises when shutting down Makerverse…Mr. Joel at Makermade said to hit CLOSE on Makerverse software after you are done and then “X” out of software…hopefully I am repeating him correctly! Problem is that the COM port does not “shut down” and the M2 control board continues to “whine” / stay on…only physically shutting off the power to the M2 control board seems to close the COM4 port so I can successfully start a new session…this is a very strange error BUT I watched the latest Makermade CNC weekly Youtube group meeting and it was mentioned at the end of that video that improving the Makerverse software to better deal with Windows 10 operating system COM ports is actively being worked on, this tells me that I am not alone with this frustrating weird problem…BUT the problem of not being able to connect and start a new session in Makerverse in COM4 port seems to be easily fixed by CLOSE - ing + “X”-ing out of Makerverse AND physically turning the M2 control board OFF then back ON and then re-opening Makerverse…I am guessing this will be very helpful to many people with Windows 10 computers who sooner or later will discover this problem that had me completely frustrated and confused
I am doing TEST CUT #2 of my logo on same piece of coroplast and will post results when session is done…so far so good though
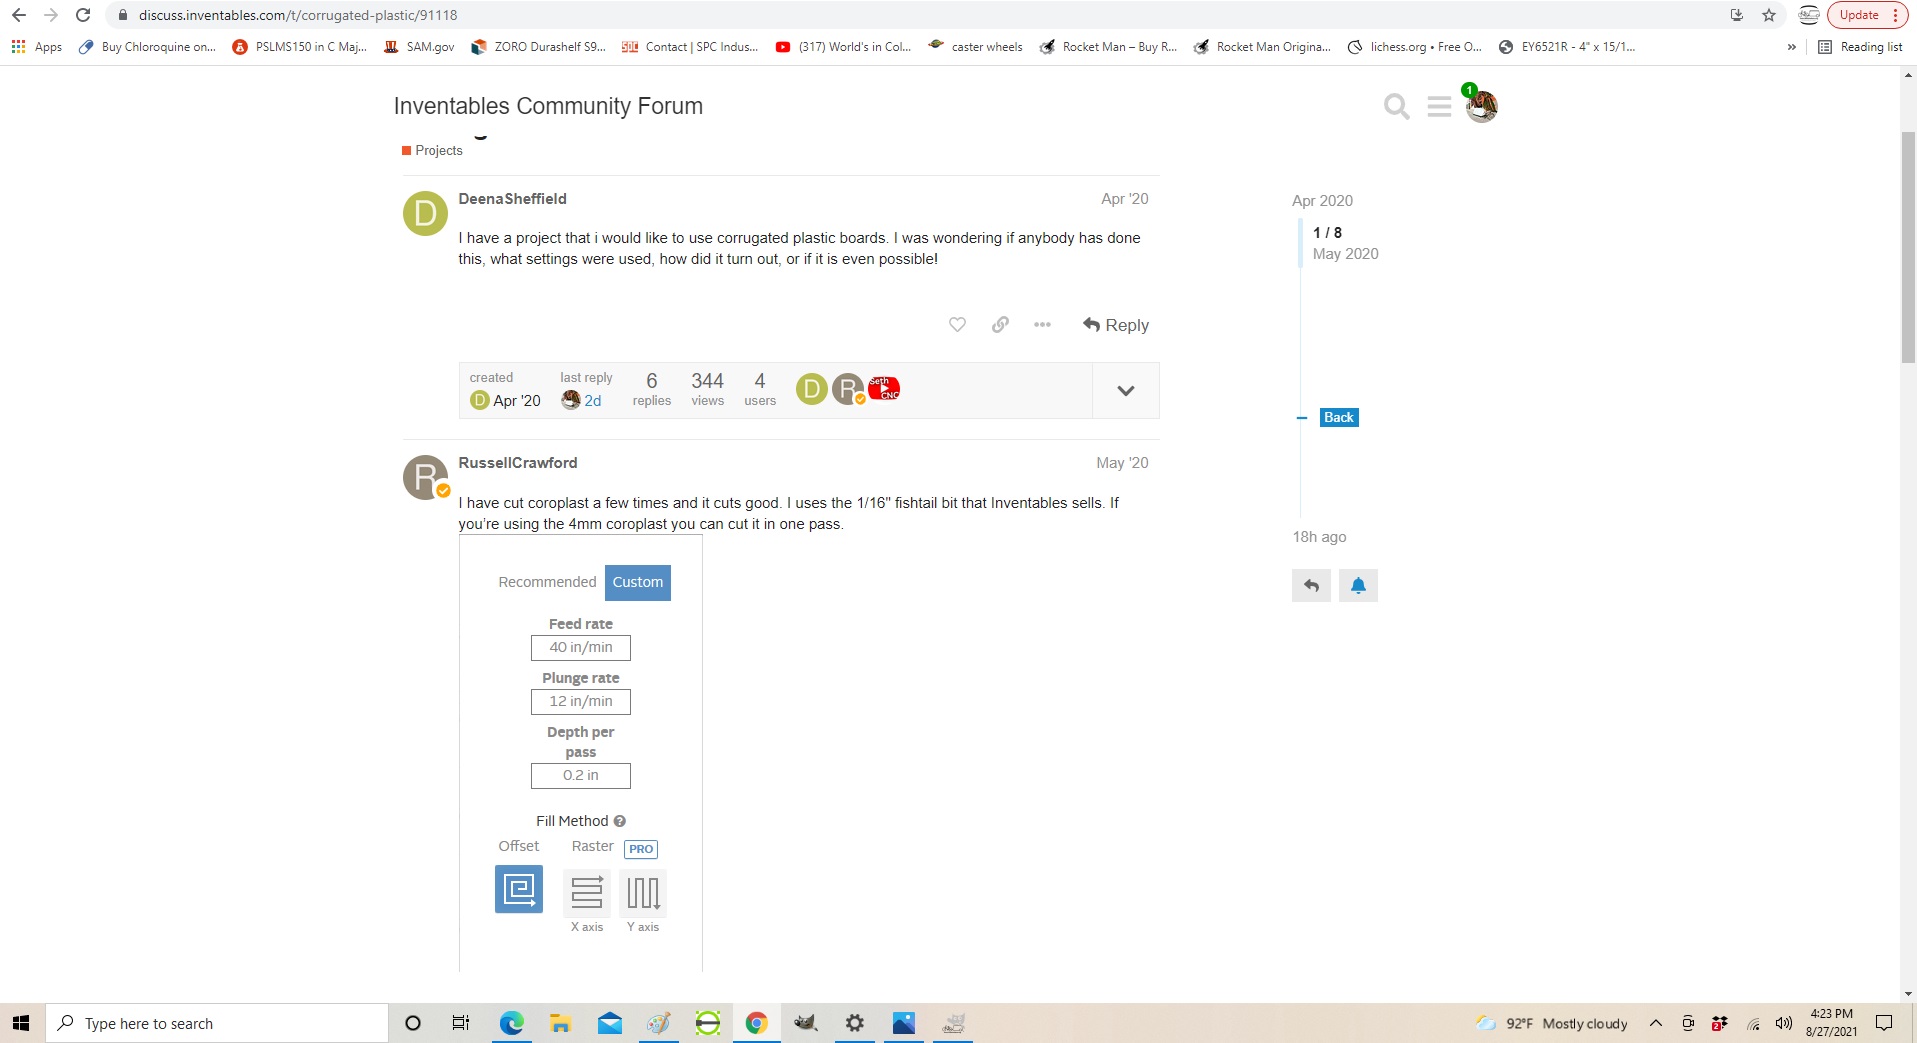
PS, I found Easel settings for coroplast CNC routing on the Easel forum that I am certain will be helpful to somebody out there, it was helpful to me althoughj I am using the included straight cut 1/4" router bit that came with M2 router bits kit…I do plan to purchase a 1/16" bit in near future though…the 1/4" straight cut router bit is too big for detail work like letters and thinner lines…PS coroplast is a cheap, easy material to practice on also by the way
ing + “X”-ing out of Makerverse AND physically turning the M2 control board OFF then back ON and then re-opening Makerverse…I am guessing this will be very helpful to many people with Windows 10 computers who sooner or later will discover this problem that had me completely frustrated and confused
closing the makerverse software should not require you to X the window, if it
does, then the makerverse software is not properly exiting, which could account
for all of this.
do the motors on the maslow stop whining after it’s idle for a few seconds (that
happens in the normal firmware, don’t know about the m2 firmware), if so, wait
until it stops making noise before shutting down. in the normal firmware, that’s
the point where the firmware saves it’s position and is safe to shutdown.
David Lang
DING DING DING yes that is my experience. I hit CLOSE button on Makerverse in upper left hand side of screen which disconnects and removes the work file I just finished cutting BUT the M2 control board still is whining and the entire Makerverse software window still stays on the screen…I am with you 100% that either I am doing something wrong just not understanding the proper way to shut down the Makerverse software and M2 CNC Machine and control board // OR // there is a problem
in better news, I successfully accomplished test cut #2 of the business logo for bikeshelters.org on this scrap piece of 6mm white coroplast…I set cutting depth at .24" / 6mm but there remained a slight amount of the coroplast at backside which is fine, it kept all the smaller pieces from falling out…I set my 1/4" straight cut router to cut “INSIDE TOOL PATH” in the Easel software and truly, I should go out and buy an 1/8" straight cut router bit for such a small logo sign…but obviously most of the time I will be doing bigger stuff using as much of the 4’ tall x 8’ work surface mainly cutting bicycle trailer shelter bulkhead panels with perforated hole bend lines to speed up the building of bike shelters components and also allow the creation of bike shelters that have curved round roof sections with more interior space and other much larger multi-person emergency shelters for the homeless services organizations in all the big cities…
anyhow, here is picture of successful test cut #2, I am happy and covered up the machine for the evening to relax, what a difficult last few weeks but now I am better understanding how to build and set up + calibrate these M2 CNC Machines

thank you all for your encouragement and excellent advice, this is an extremely difficult machine to get up and running…absolutely the most difficult thing I have ever built
3 Likes