First Project Issues: Z-Axis, Edge Burning, Bit Dulling

Hello, Maslowvians, I come in peace, and looking for help with my first project.

Here’s a picture of my most successful test to date:

Here’s one of the problems I’m having:

The pattern is cut starting at the left side of the workpiece, and moving in columns to the right. Each pentagon shape is cut in a single pass, the bit plunges into the center of the shape, and carves it out, stopping in one of the right hand corners. What I think is happening is that as the bit rises very slowly, it vibrates in place, causing a little friction, burning the wood, heating the bit and dulling it, making the problem worse as it progresses. Here’s an edge-on view showing how the problem gets worse from beginning to end:

Here’s a picture of the bit when it was all over:

The router speed was set to 16000 RPM, and as soon as I saw the wood singed at the beginning, I turned the speed down, and then when it still kept burning the wood, I turned it down to the lowest speed, 10000 RPM. That obviously did not help, maybe by the time I turned the speed down it was too late?

I used Easel software to generate the g-code. Here are my cut settings:
45%20AM 45%20AM

The other, and maybe related issue is the z-axis. The first cuts are about 0.2 inches (supposed to be 0.25), and the last are about 0.33 inches. Also, the router got stuck down a couple of times near the end, but (to my surprise) recovered. Here’s some pictures of that:

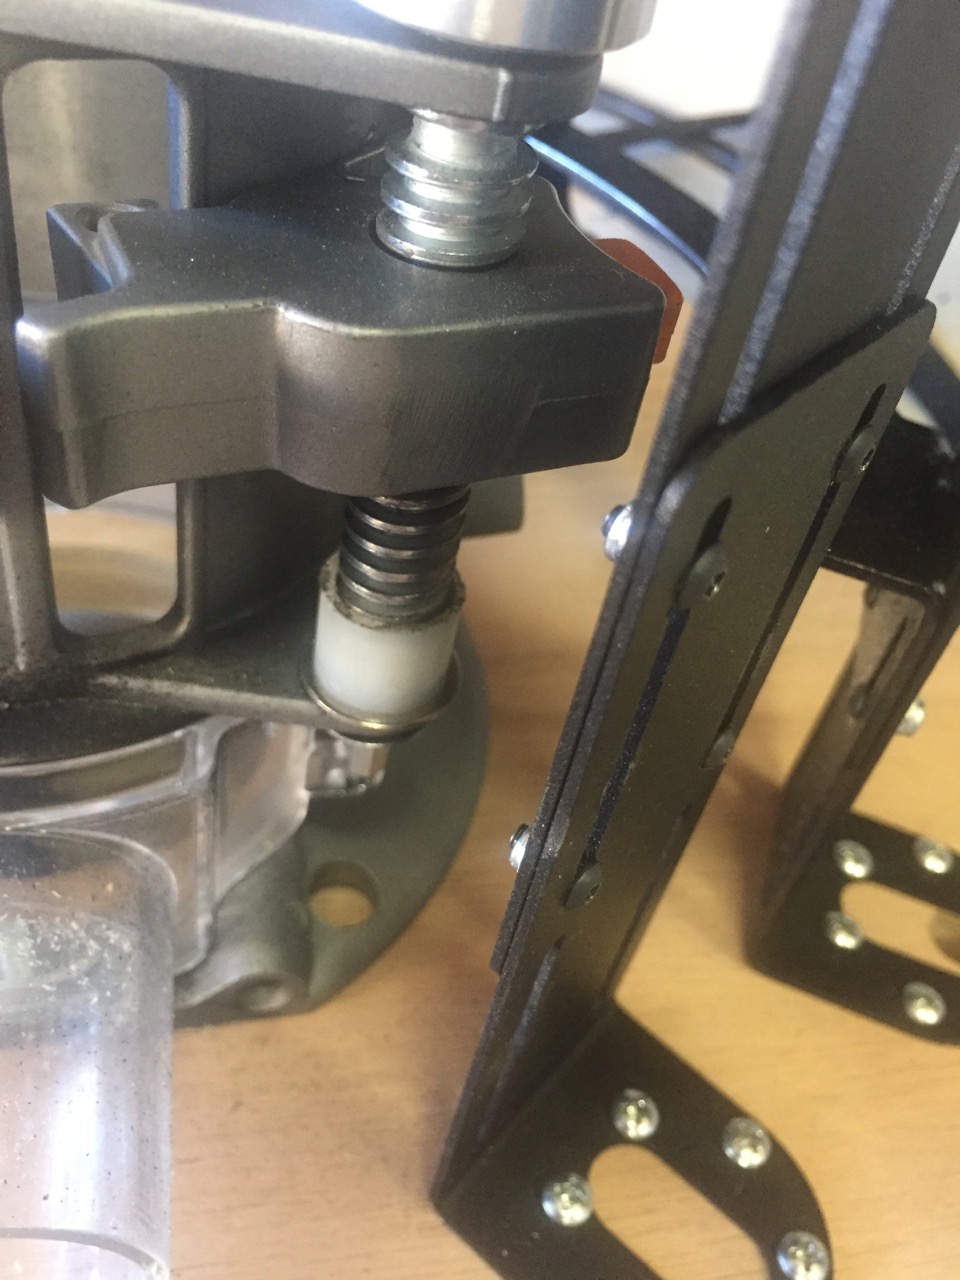
I’m using a Ridgid 2200 and modified it with a washer and bushing as per: Inexpensive add-ons for z-axis slack imprecision
I also added a strong bungee cord over the top like this:

One obvious issue is that the bushing came off at some point, so maybe that explains all or most of my z-axis issues.


I’ll have to get some stronger glue.

Any help resolving these issues would be greatly appreciated.

2 Likes

Be careful not to put too much force on the top of the router with the bungee as it will cause your tab holding the router to pop out and your router will plunge all the way into your piece.

I would say the consensus is you should only cut the depth of at most half of your bit. So your cut depth should be around 1/8 in.

I would recommend adding the bushing to the other side of the router tab so you dont bottom out.

2 Likes

Mccand, thank you for those tips.

I’ll try a lighter weight bungee. Usually, it’s just the force of gravity pushing down on it, so that makes sense.

I’ll try an 1/8 inch depth.

I actually did try with the bushing on the other side, but was worried about it topping out. Maybe I’ll cut it in half and split the difference?

Does anyone think it might be worth my time to try to edit the g-code to move the bit away from the edge before the z-axis up move?

Yes! That is called “Lead in/out”, here’s a post on it that looks OK:

3 Likes

Thank you, bar! I’m still learning my terminology.

1 Like

It also appears you are skipping tabs completely which may cause the center piece to fall and wedge in and cause the burning while the bit is retracting and also forcing the bit to the side and over cutting the border

DakotaJim, these are all pocket cuts. They’re supposed to be 0.25 inches deep.

oops, sorry, my bad.

No worries. Thanks for checking out my post.

Regarding the changes in depth of cut, be sure the workpiece is as flat as possible… warps, which for me seem to be most common on thinner stock (1/4”) are one cause for changes in the cutting depth.

2 Likes

Thank you, Dustcloud. I’m using 3/4" plywood, and I screwed it to the waste board. It was a little warped before I screwed it down, and it might still be a little. I’ll be sure to check it before my next test cut.

As others have offered I suggest putting the bushing on the other side of the router tab, be sure your travel height will not run the bushing into the top of the carrier. I tried several glues and ended up using JB Weld.

The casting of the router base is fairly rough (is was not originally designed to move up and down on the fly). I sanded the entire inside of the router base and the alignment pin grove to remove all imperfections and finished with 600 grit wet/dry sandpaper. I sprayed the router body with dry graphite lube and it makes the z axis move like butter and has been durable.

it looks like you have a bit of a circle cut in the corner, it could be that your CAD/CAM is sending that as many very short movements. That would cause the router to stay in one place for a long time and burn the wood.

ShadyG, thanks for the tips.

I decided not to be wise to break the rules, so I did put the bushing on top, also I got a nice beefy steel bushing (actually a lock collar, which I took the set screw out of), and used JB Weld SteelStik epoxy putty to put it on. I tested it with a pair of pliers after it cured (just 1 hour) and sure enough it was stuck good.

A while ago I noticed that the channel for the pin on the router was kind of rough, so I took a file to it, and smoothed it out.

I’m running a second test with the this bushing fix and g-code fix (see below), and so far it’s looking great. The z-axis is tight–I’ve been checking the depth as the test progresses, and it’s been locked on 0.25 inches across the whole piece. Also, with the g-code fix, there’s no burning, and the bit’s staying sharp. I also took Mccand’s advice and used a weaker bungee across the top of the router, and making two 0.125 inch passes rather than a single 0.25 inch pass.

1 Like

dlang, bar had it right, it was a lead-out issue. I have a whole post on it on my website, hipnerd.com, but long-story-short: I fixed the Easel g-code by writing a a regex in a code editor to add my own lead-out.

1 Like

One other thought, while I agree the lead-in / lead-out issue is your main problem. However, once you burnt your bit, it probably was much duller, so by the time you turned down the speed, it was probably too late for that bit. I think the consensus around here is that you want to turn your router speed down for the Maslow, particularly for harder materials.

jwolter, that was my guess as well. Anyway, the followup test is finished, and it was a total success! Thanks to everyone for their valuable input.

8 Likes